Relationships between contacts
Relationships between contacts can have relationships with other contacts to assist you with billing, contacts and marketing activities.
For example, a corporate customer may enrol and pay for their staff members to complete training at your college, employer and student details can be connected for traineeship management, parents contact details can be collected for minors, for billing and emergency contact details, and spouse and friend relationships can be captured for use in marketing campaigns e.g. 20% discount when you refer a friend.
Adding a relationship
In the contact window, you can add a relationship by clicking the + next the 'Relations' header. This opens a new sheet where you can type in the name of the contact you wish to add and define the relationship type.
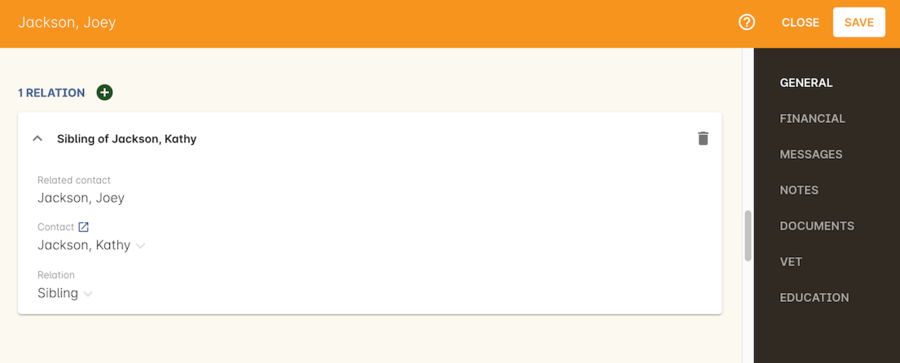
Figure 77. Adding a relationship to a contact
You can also define relationships through the checkout process so that if the enrolment process connects two existing, but unrelated contacts, you can add the new information. When you add a second or subsequent contact to an enrolment, simply go to the relations section of the contact record, hit the + button and search for the contact.
All contacts can have multiple types of relationships with many other contacts. Relationships can also be deleted as needed by using the trash icon next to the relation record in the contact edit view.
Adding different types of relationships
To add a type of relationship between contacts, go to the Preferences window and scroll the left-hand column till you see Contact Relation Types. Here you can create different types of relationship like; Parent to Child.
Searching across relationship types
If you are in the contact window and want to find someone with a relationship to the contact currently highlighted, simply click on the Find Related icon and select "Contacts related as...", then select a specific contact type, or all related contacts. This will open a new contact window showing the results.
You can find either all records related to a contact via any relationship, or via a specific relationship type. For example, you could find all the students enrolled in 'Craft for Kids' and then find all the contacts related to them as parents.
Using relationships in Checkout
When relationships have been defined within contacts, they can be used to build enrolments quickly.
When a contact is added to checkout, the people they have relationships with are shown automatically if you click within the 'Find Contacts' field again. You can add these contacts to the same enrolment by clicking on them.
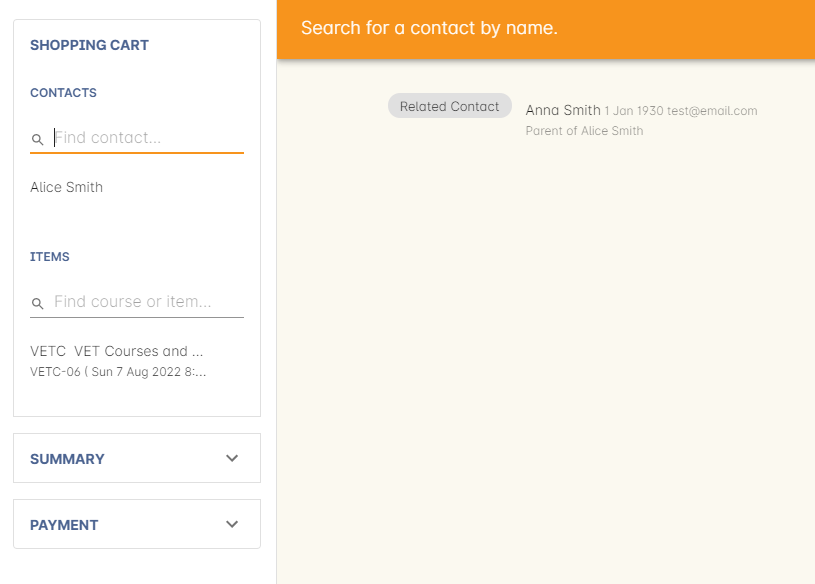
Figure 78. Contact with relationships showing in checkout
Contact's financial records
When a contact is invoiced, or makes a payment, an entry is made in the contact’s financial records.
This is visible in the Financial section of the contact record.
Often, a student is invoiced and pays for their own enrolment. When this occurs, you will see the financial data in the student’s Financial section. When the enrolment is paid for by another person (often termed a 3rd party payment) the financial data will be on the payer’s Financial section, and not the student’s.
All the financial transactions are shown in creation date order, with a running total that shows the contacts balance at any point in time. Invoices, credit notes, payments in and payments out, will all show on the Financial section.
You will also note from the following example that each payment line of the financial section will identify if it was an incoming or outgoing payment. E.g. 'Credit card payment in (office)' reflects a payment in.
In the financial section you also have the ability to set some financial defaults that define settings when the conact is invoiced.
Invoice terms days: This will be show the system default as defined in your financial preferences, but can be unlocked and set to a value specific to this contact. For example, your default may be 7 days but some contacts may have 30 day custom terms.
Tax (override): By default, all contacts will be charged the tax rate set for the product or class.
However, some contacts may reside overseas and may not be liabile to pay local taxes like GST. In this case, you can choose to override to N for no GST to be applied to any invoice line created for an invoice joined to this contact.
Not this does not affect invoices created in the past - only invoices created after this setting is applied.
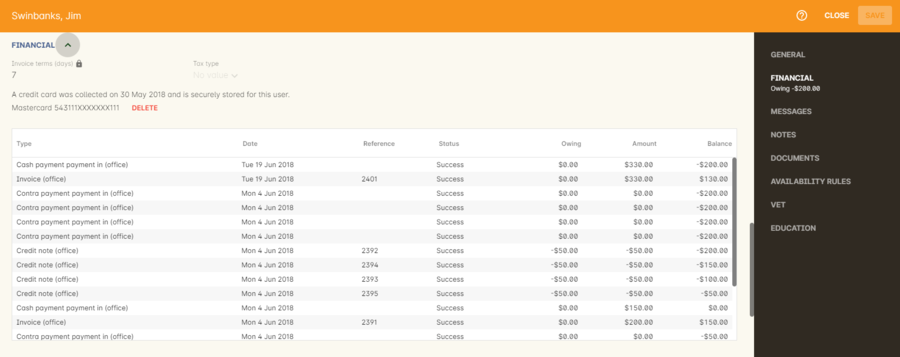
Figure 79. The financial section of the contact record
Stored Cards
If you have stored card information for future payments for the contact, it will be displayed here.
You can clear the card details by clicking the delete button.
Abandoned Carts
If the contact has any abandoned carts on your website detected by the system, they will be stored here. The user will see them upon returning to your website. There are automations available that will send out emails reminding customers of their carts. Abandoned carts can be manually deleted by hovering over them and then pressing the delete button.
Contact message history
In the Messages section you can see the contact’s entire message history. Almost all messages sent out of onCourse will appear here - only messages sent directly via custom scripts will not.
You can review the content of any message by double-clicking it.
Notes section
This section keeps a list of all notes you have relating to the contact. You can add a new note in the 'New note' field at the top of the section. Below this will show you a list of previous notes created, these fields are not editable. Each of these entries has the date and time it was created, along with which user created it.
When creating a new note, to save it, first either click the tick icon in the note card, or click elsewhere on the screen, and the tick will turn green. Once the tick is green you can click Save to save the record.

Figure 80. Notes section in a contacts record
Contact documents section
Drag and drop any new documents into the window to upload and attach them to the contact. If the document is already uploaded, click the + button and search for it.
All types of documents can be added to the contact record, such as copies of completed assessment activities, permission forms and signed declarations for funding agreements. The onCourse document management system will store and version control these records. You can click the document icon within the panel to view the document.

Figure 81. The documents section of the contact record
Adding Pictures to Contacts
Each contact (student, tutor or company) can have an identifying image attached to their record that is visible as part of their general information.
-
To add an image, open a contact record and click on the image place holder.

Figure 82. Image placeholder: Click on the head and shoulders image to add a photo
-
Select the image from your computer that you would like to use and press ok.
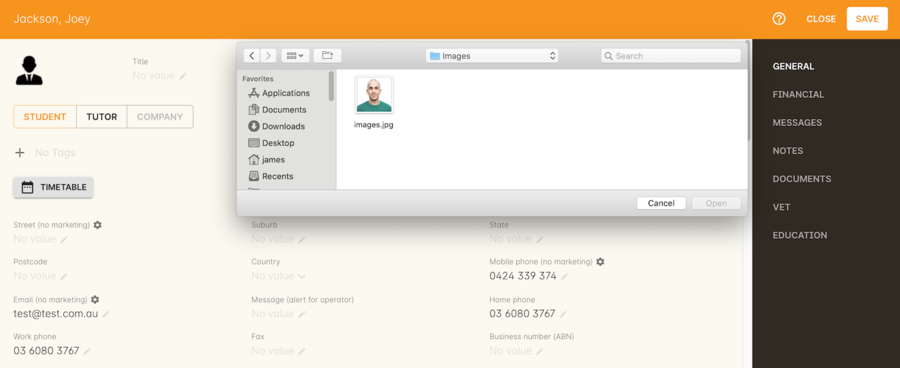
Figure 83. Adding a photo to a contact
Gravatar images
Gravatar images will automatically load for contact records if the user has a avatar linked to their email address at https://en.gravatar.com. Gravatar images are overridden with locally uploaded profile photos.
To make sure you have a Gravatar licence enabled within onCourse go the Preferences window and scroll the left column till you see Licences. Click Licences and you should see it listed in the Enabled Features list.
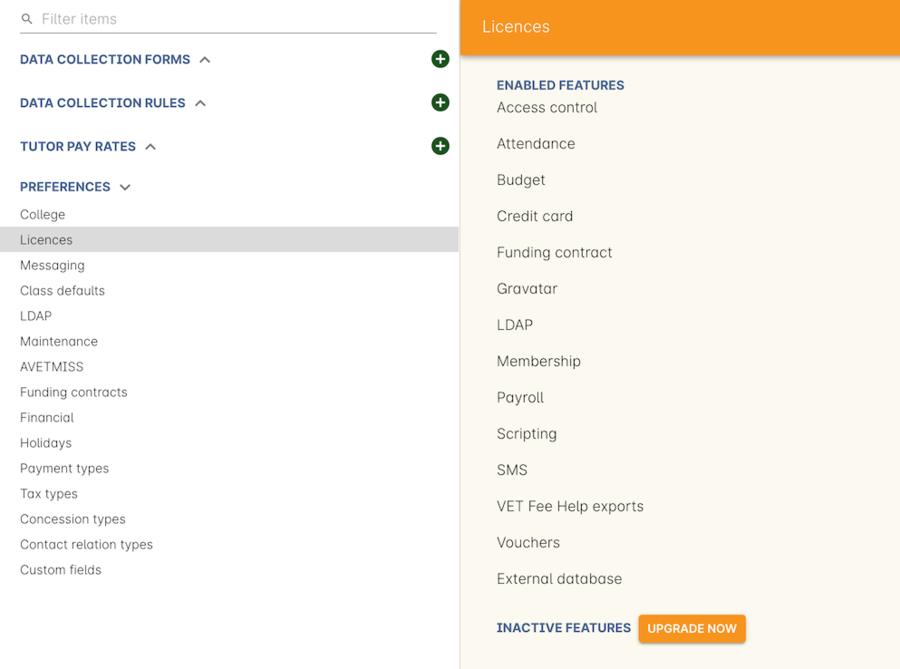
Figure 84. Where to check if your Gravatar licence is enabled
These images will also display in the tutor portal on the class roll for student identification purposes.

Figure 85. What the tutor sees when marking a roll
Availability Rules
You can set different availability rules for contacts, say in the example of when you know a student will be away on holidays.
Adding VET data to students
Contacts who are marked as students have a section labelled VET. In this section, you can record the answers to the standard AVETMISS student questions regarding their country of birth, prior educational achievement and other required detail. For customers using an onCourse website to take enrolments, these questions are asked of the student at the time of enrolment. Only valid answers can be entered into these fields, with most fields referencing look up data such as the ABS list of countries and languages, or the approved list of AVETMISS responses.
For Victorian and Queensland customers, the field to record the student number is also located in the VET section.
For CRICOS providers, additional fields are available to record the student’s passport, visa and health care details. This information is not reported as part of the AVETMISS standard.
Additional information, like the CRICOS student’s next of kin, emergency contact or home-stay provider can be captured using the contacts relationships feature.
If your students decline to provide information for one or more of these fields, we will automatically export the approved 'did not respond' code for that question, and ensure that validation errors, like students speaking English as their first language and reporting themselves as speaking it well, are not exported from onCourse to cause problems with your funding providers.
Please note that some student related AVETMISS questions are also located in their enrolment record, where the response is particular to that enrolment event e.g. their traineeship approval number or reason for study response.
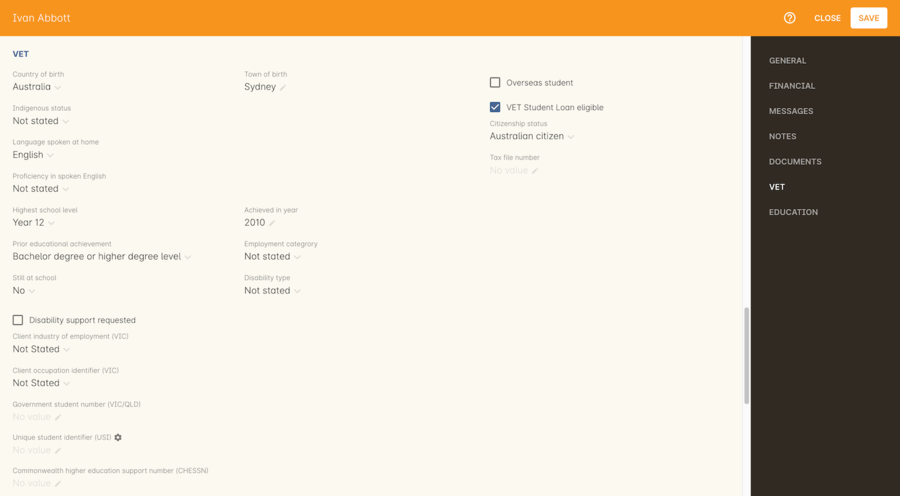
Figure 86. The VET section of the student record
Student's Education history
The history of a students enrolments, outcomes, prior learnings and certifications is available in the Education section.
Enrolments are shown in a sub-list, with the associated invoice, time of enrolment, course details and status. If you click on the '+' symbol next to the Enrolment heading then this will pre-populate checkout with the students contact data. When a student’s enrolment has been cancelled and/or credited, the enrolment status will show cancelled or credited.
A complete enrolment history is retained for each student, including classes they have withdrawn from, so you will always have a full picture of their engagement with your college. Enrolments cannot be deleted, but they can be cancelled, a credit note created, and that credit applied towards a new enrolment.
The second list shows a list of any prior learnings that have been added to the record.
The third list component shows the outcomes for all the units linked to all the student’s enrolments.
For non-VET enrolments, these will include non-assessable outcomes for their enrolments. You do not need to set anything for these enrolments, even if reporting them via AVETMISS, as an outcome’s status of 81 is always exported for unset statuses in these types of outcomes.
VET outcomes will show the national code and unit details and you can double-click on this outcome to make changes or update the status.
When an enrolment is cancelled, the outcomes linked to the enrolment are deleted, except if you have already assigned them a status or used them to create a certificate. In that case these outcomes will be retained on the student’s file.
The final list component of the enrolment record shows all the certificates (both Statements of Attainment and Qualifications) issued to the student. Unprinted certificates can be edited by double clicking on them, printed certificates can be revoked, but not edited. You can print certificates from the certificate window only.
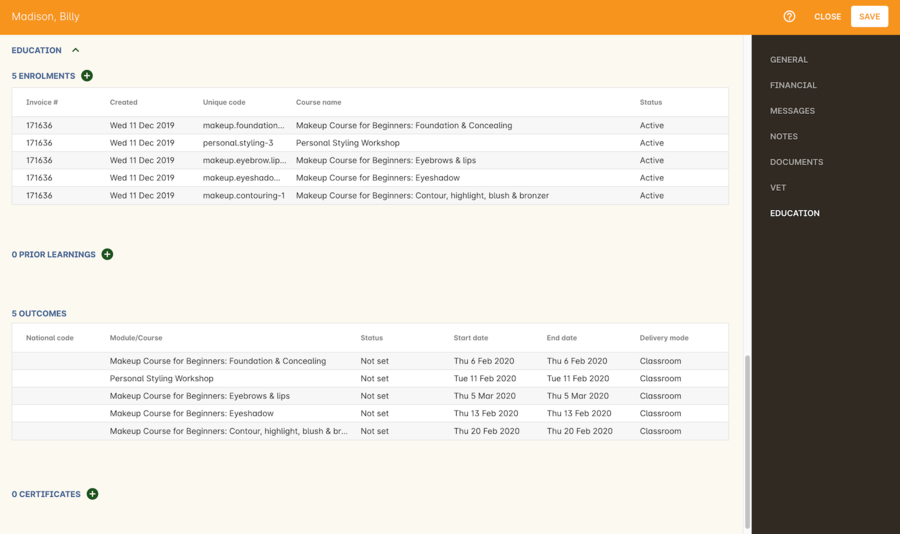
Figure 87. The Enrolment section of the student record
Education section
This section only appears if the contact is a student.
This allows you to see all the enrolments they are currently enrolled in and have been enrolled in the past.
If they are enrolled into any VET classes you will see information about the status of the modules and qualifications.
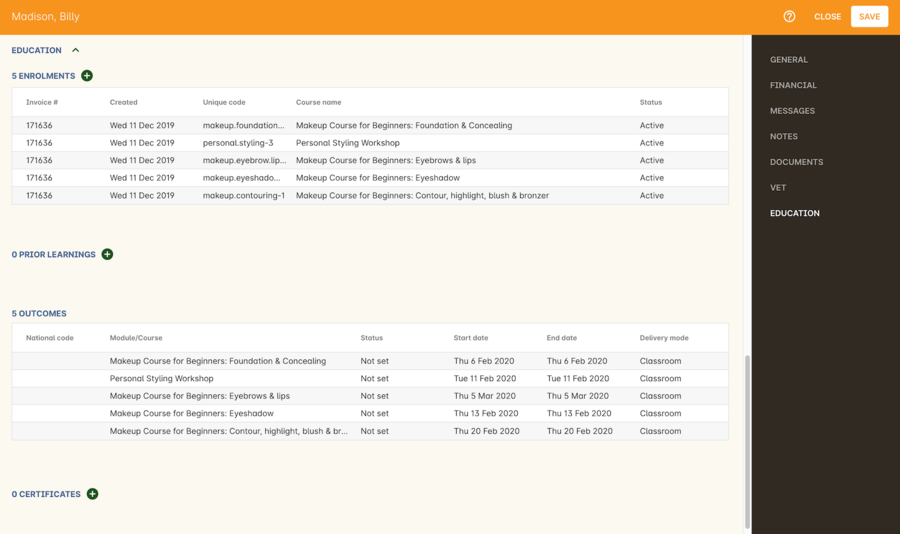
Figure 88. Enrolment section in a students recordd
Custom fields
If you have added custom contact fields to your onCourse general preference, you will see these fields added to the General section of the contact edit view.
You will see all the custom contact fields you have created, and any response the student has provided during the online enrolment process or responses you have manually entered into their record.
If you wish to add additional custom fields to your database, either for Contacts or other record types, refer to the preferences chapter of the manual.
Special needs information can also be added to the student contact record and appears just below the custom record fields. These special needs could be additional information a tutor needs to know as part of the course delivery, such as the student needing access to a hearing loop, or information for dietary preferences and catering.
Student special needs can be printed to provided to a class tutor or coordinator via the class window, clicking Share and then selecting the 'Student special need report'.
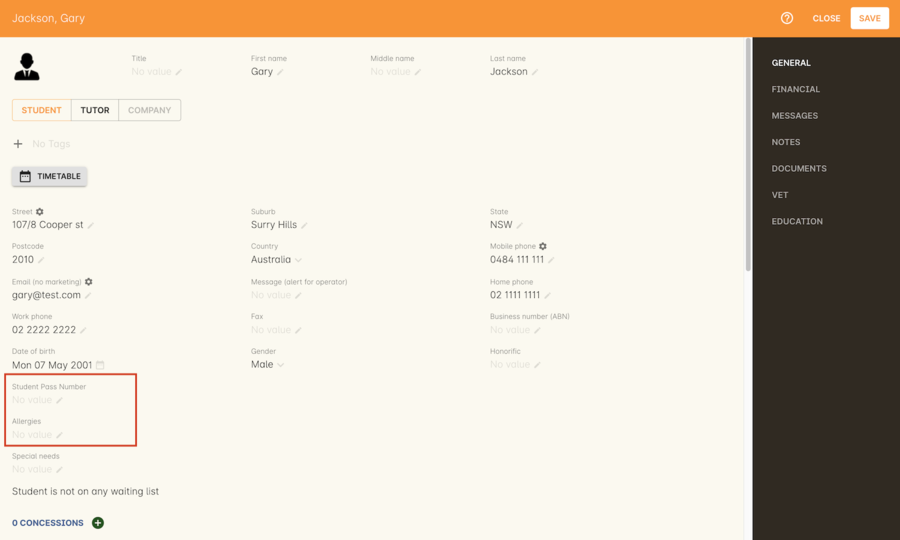
Figure 89. Custom fields appearing in the General section of a contact record
Updated over 1 year ago
