Creating a new tag group
To create a new tag group, begin by going to the Tags window (search for Tags in the dashboard search) and clicking the + button next to the 'Tag Groups' heading. Creating a new Tag Group will also create a header tag.
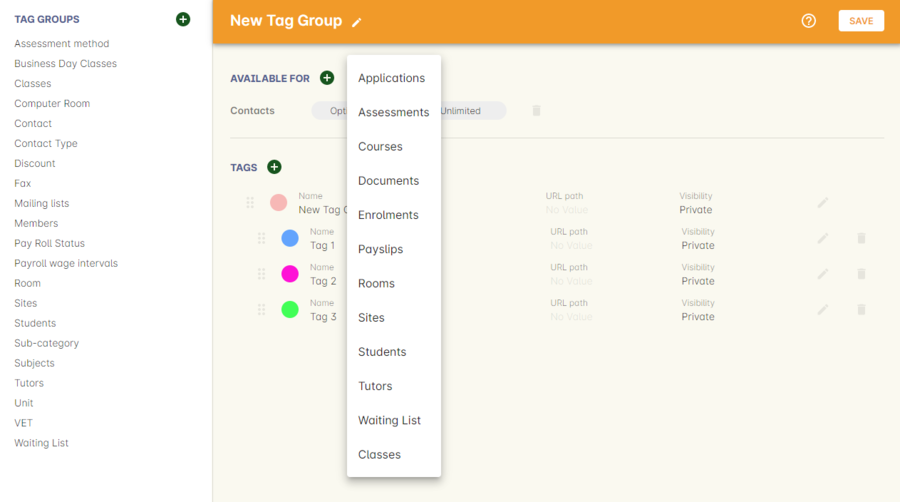
Begin by giving your tag group a name and deciding which part of the onCourse database you want this tag group to apply to using the + button next to 'Available For'.
A tag group can apply to multiple record types, including those that are parent and child records. e.g. a subject tag is able to be selected for both a Course and a Class. A tag on a parent record will also not be searchable in its child record. So a class that is attatched to a course that has a tag, cannot be searched for on the classes page with that specific tag, if the class itself has not been given it.
Only tags which apply to 'Courses' will be available for display and navigation on your onCourse website. Tags which apply to other record types are for internal filtering only.

Figure 137. Configuring a tag and what it will be applied to within onCourse
Begin building your tag structure by using the + button next to the 'Tags' header. The first time you click + in a new tag group, that will create the parent tag. Each subsequent click of the + button will add a child tag underneath the parent.
If you wish to adjust the tag structure, you can also drag and drop the ordering from the default alphabetical sort order.
You also have the ability to make changes to the root tag, however you won’t be able to add a sibling or delete the root node. In the case of the special Subjects tag, you cannot change the root tag name.
Editing a tag colour in edit view
Tags also have a colour associated with them. You can edit the colour of a tag by clicking the pencil icon on the right side of the tag to open the edit view.
To edit the colour, click the coloured circle and two sliders will display. The top is hue, the bottom is saturation. Once you’ve amended it to the colour of your choosing, click the Save button.

Figure 138. A contact filter using the subjects tag to show students enrolled into classes joined to courses tagged with the subject
Updated over 1 year ago
