Creating certificates
There are three parts to the process of creating certificates in onCourse.
1 - Creating the certificate record
This is either done automatically as part of a scheduled script, manually as part of a bulk process for a group of students, or individually.
2 - Verifying the certificate record
Before printing, check the details are correct. Additional validation will also take place during the print process.
3 - Printing the certificate record
This 'locks' the certificate record for further editing and creates a printed Certificate and Transcript based on your certificate report templates and selected background.
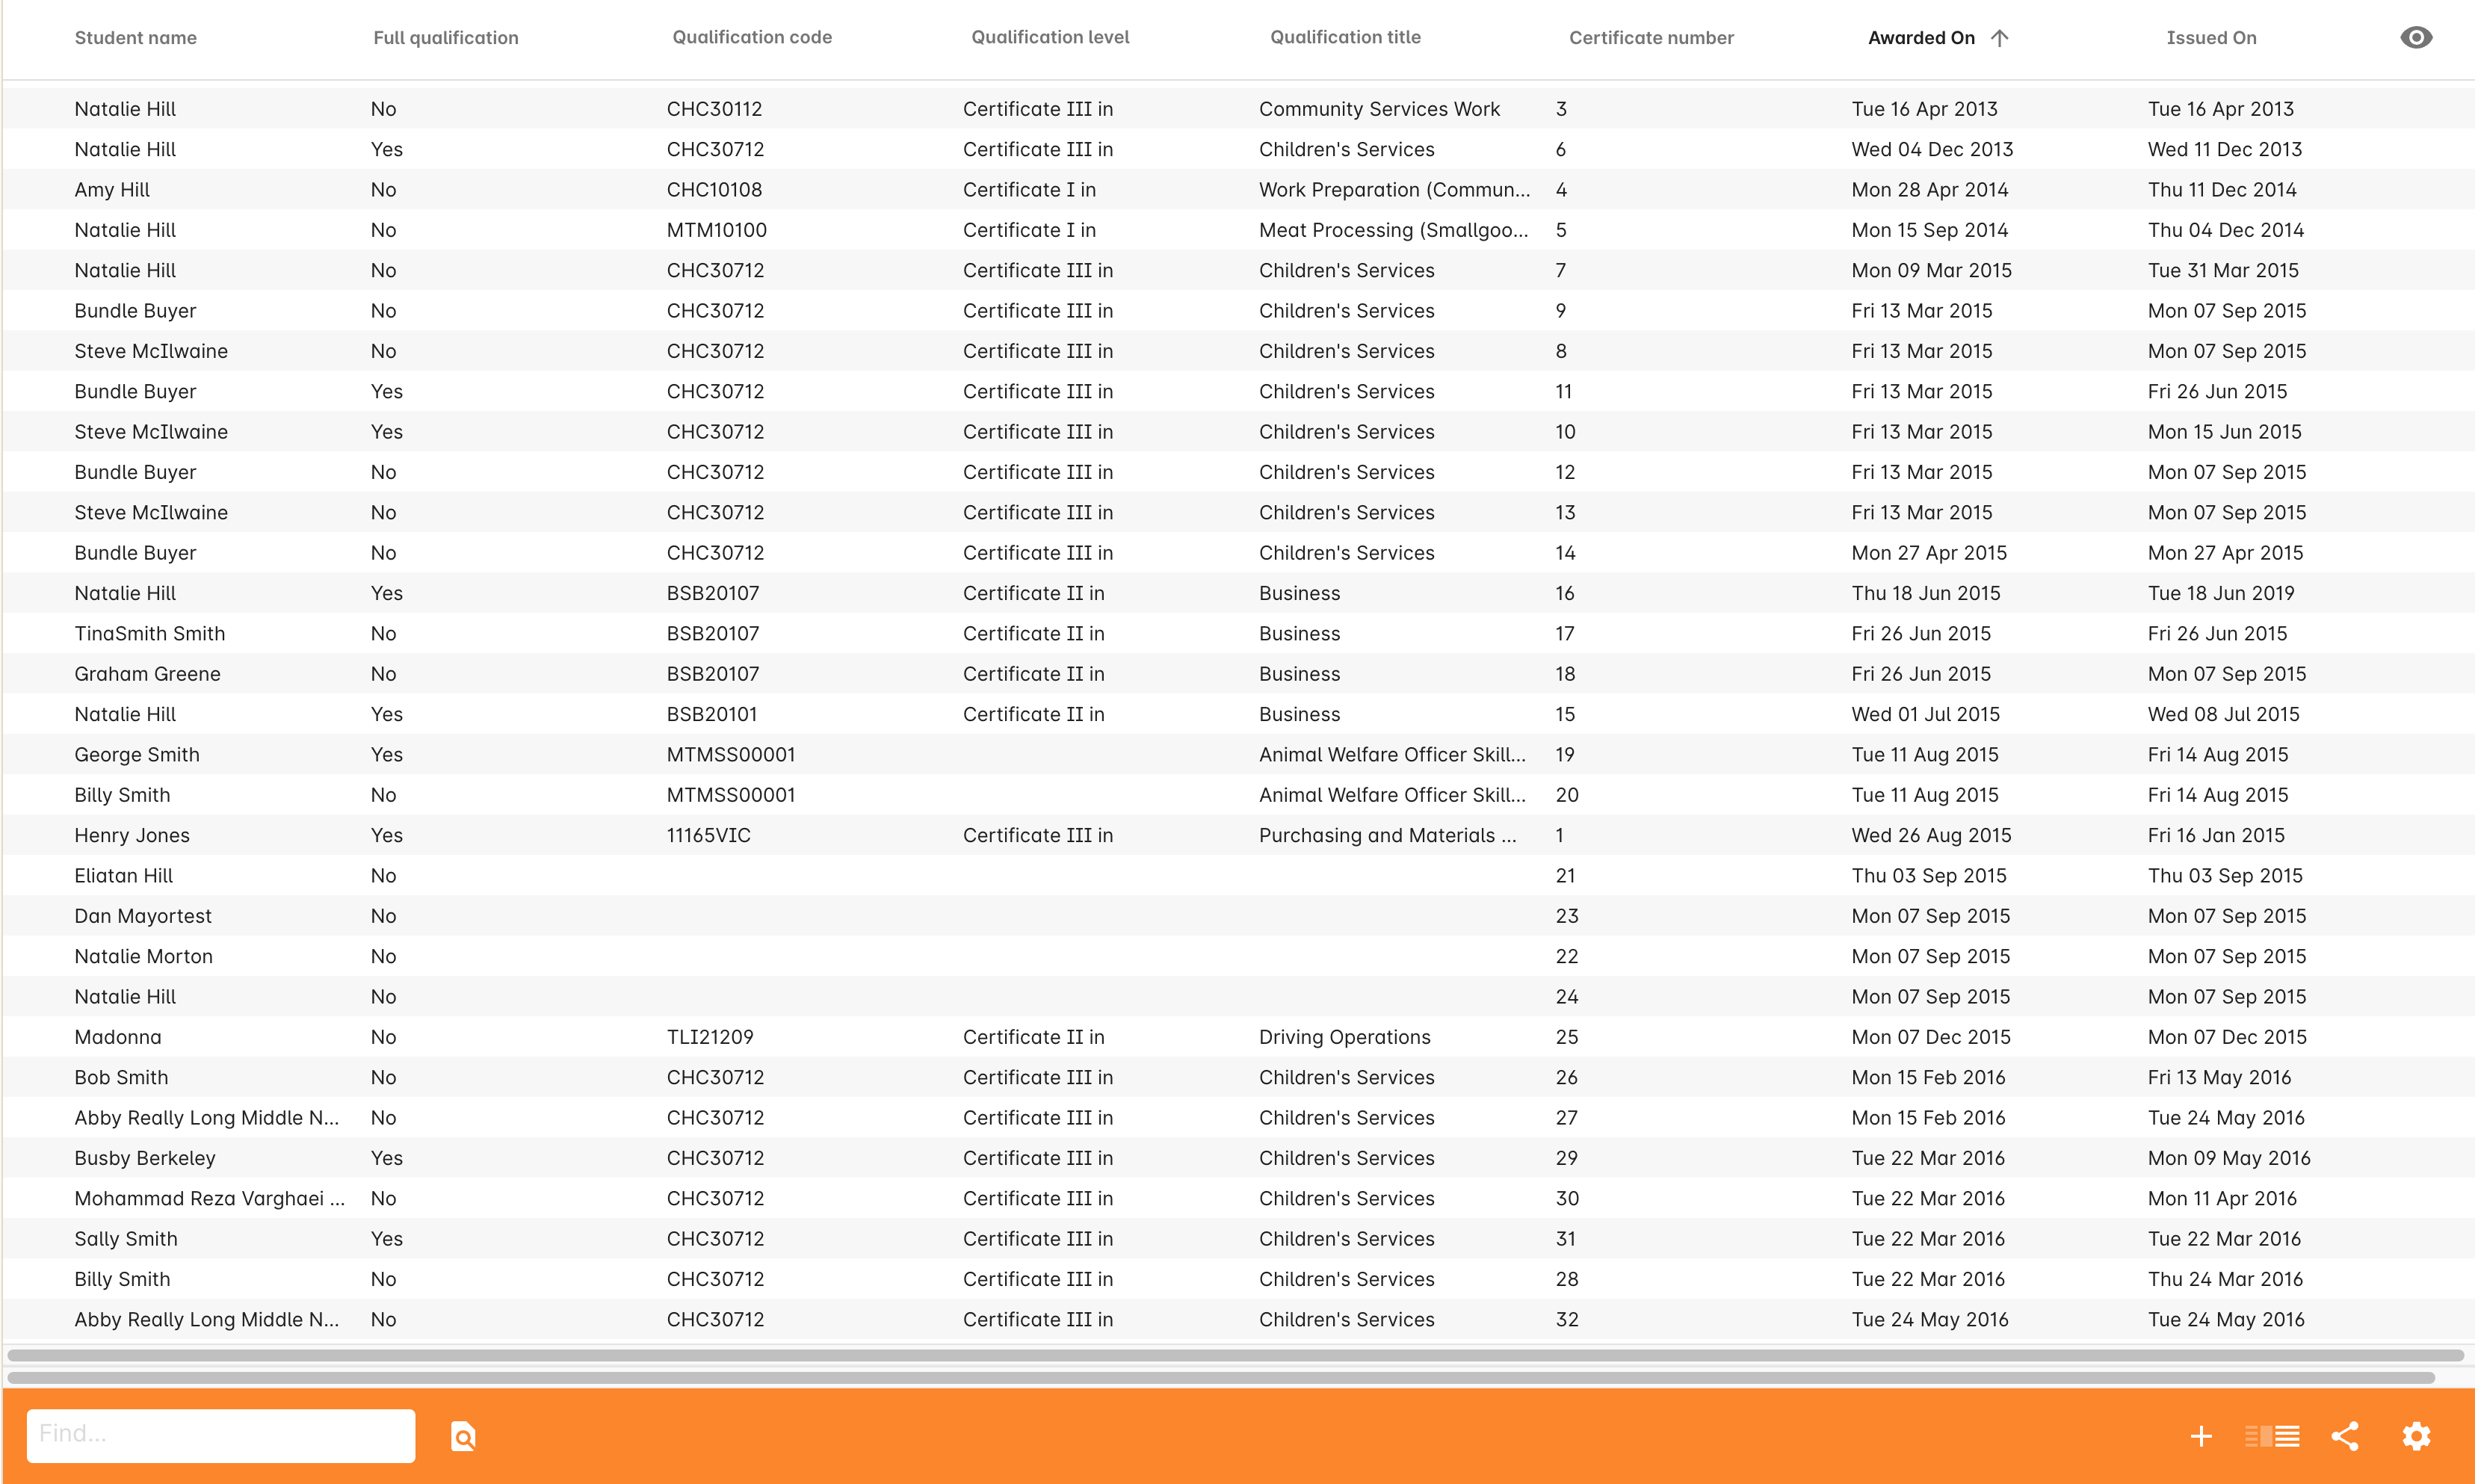
Figure 419. Certificate list view - this is the register of all certificates created,printed and revoked in your organisation
Step 1 - Creating the certificate record
Automating the Certificate creation process
There are two pieces of the VET certification process you can automate with default scripts. You can choose to enable one or both of these scripts depending on the business automation aspects you wish to use:
- Automatic Creation of VET Certificates: This script creates the certificate records. It looks at the units attached to the student’s enrolments, and the Qualification properties of the course they have enrolled in. When all units from the enrolment have been assigned outcomes, the script creates either a Statement of Attainment or Qualification/Skill Set certification for the student.
- Send certificate vet created notification: This script issues a generated PDF copy of the students certificate to their Portal page. It if the certificate is eligible to be printed based on the student’s USI status being verified, and then prints the certificate, attaches it to the enrolment record, uploads it to the portal and sends the student an email notice where they can click and retrieve their certificate without a password (for 7 days) or retrieve by entering a password past 7 days.
Enabling the automatic VET Certificate creation script
Like most included scripts, the 'automatic creation of VET Certificates' script is disabled by default. To automate this script you will need to enable it in the Scripts window.
The script checks at 4am every day check for outcomes which have been modified in the previous 24 hrs. If any outcomes attached to the enrolment are not yet marked, the enrolment is skipped for certificate creation. When all outcomes have a status, then the certificate creation process is triggered. This means if outcomes are marked over time, the certificate will not be created until the last outcome of the enrolment is marked.
Creating certificates manually
If you have a student who has collected units of competency across multiple enrolments and you want to print a certificate showing this, you can create a manual certificate directly in the certificate window, selecting your choice of qualification reference and appropriate units from their entire transcript list. To create a certificate record manually:
- Open the Certificate window and click on the + sign to begin creating certificates.
- Type the student name into the first field. This field is clairvoyant and will detect results as you type. The student must be in the database and the name entered correctly to proceed. The students suburb and date of birth will be displayed when their record is found.
- Enter the National Code for the Qualification, Accredited Course or skill set you wish to use for the certificate. This is not limited to qualifications the student has attempted at your college, as many units are valid towards a number of qualifications.
- If you wish to issue a full qualification or skill set, select 'Satisfies complete qualification or skill set'. 'Statement of Attainment' will be selected by default.
- Select the + sign next to Transcript to begin adding modules/units from the students record to the certificate. You can add as many as you need – you must ensure that you only add units that meet the qualification packaging rules of the qualification or skill set you selected above. Modules/units selected can be added to this certificate only once, however they can be used again to create other certificates in the future.
- By default, the 'Awarded on' date will be the date you created the certificate record. Edit this if needed. At this point, the 'Issued on' date will be blank, and will be set based on the date you print the certificate. You can manually set this date now if needed.
- Add any public notes that you wish to display on the certificate face, such as information about the funded program that this certificate was delivered under, or the language the training was delivered in (if not English).
- If your certificate should have an expiry (E.G. a first-aid certificate), you can enter the expiry date into the expiry date field.
- When the information is correct, select save.
Created certificates appear in the Certificates window. From this window, you can print the certificates. Highlight the certificate records you wish to print certificates for, select the Share icon > PDF > and ensure you select a certificate PDF report before selecting 'Share' to generate the PDF’s.
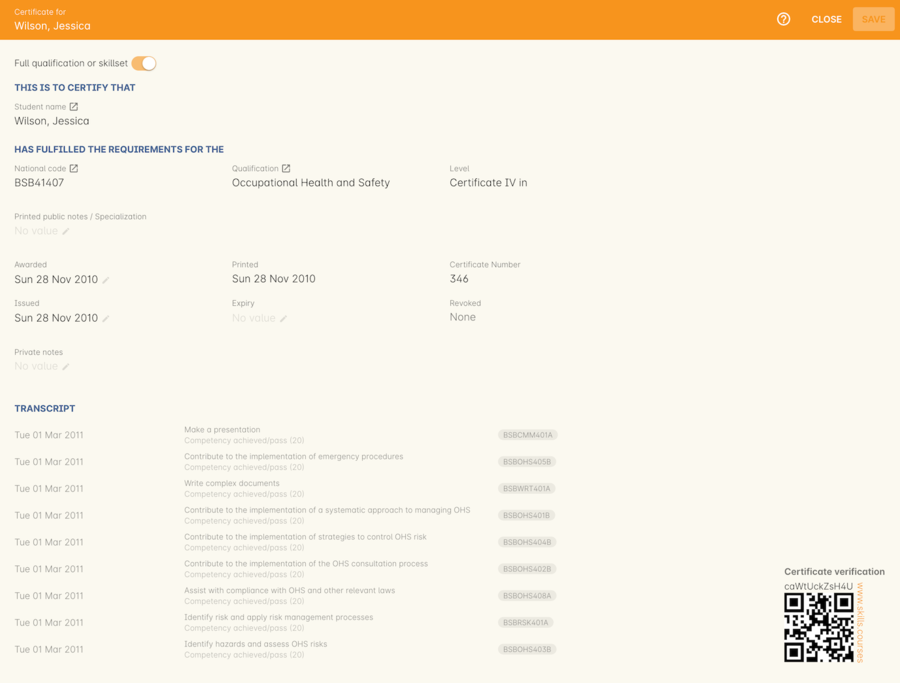
Figure 420. Certificate edit view in full screen mode
Creating certificates in bulk
How to create certificates for a class group
If you wish to create certificate records for the whole class group, we recommend creating the certificate records from the class cog wheel option. You can do this by going to the Classes window, clicking the cogwheel icon, then selecting 'Create certificates'.
- Open the class window and highlight the class(es) you wish to create certificates for.
- Select the cog wheel option 'Create certificates'. This will automatically create Statements of Attainment or Qualifications (depending what was chosen at the course level and the student’s outcomes) and transcripts for each student enrolled in the class. These records are created in the certificate table.
- Open the certificate window and edit any certificates that need changes and/or delete any certificate records that have been created for students who are not eligible for certification. Units can be added or removed from individual certificates as needed, but only prior to printing.
- You can create the certificates, but will not be able to print them, until each of the outcomes are set. Ensure the outcomes have been set in the class outcomes window, the enrolment records or via the student’s contact record.
- From the certificate window, click the Share icon, select PDF and print the certificates as needed.
How to create certificates from enrolment records
If you wish to create a certificate based on a single, or group of student’s enrolments, then you can do the same thing from the enrolment window by highlighting an enrolment or group of enrolments and using the cog wheel function to create the certificate records. This option only picks up outcomes attached to the particular enrolments you have selected (manual outcomes can be added to enrolments prior to certificate creation if needed).
- Highlight one or more enrolments in the enrolment list view window.
- Go to the cogwheel and select the option 'create certificate(s)'. This will automatically create Statements of Attainment or Qualifications (depending what was chosen at the course level and the student’s outcomes) and transcripts for each student enrolled in the class. These records are created in the certificate table.
- Open the certificate window and edit any certificates that need changes and/or delete any certificate records that have been created for students who are not eligible for certification. Units can be added or removed from individual certificates as needed, but only prior to printing.
- You can create the certificates, but will not be able to print them, until each of the outcomes are set.
Ensure the outcomes have been set in the class outcomes window, the enrolment records or via the student’s contact record. - From the certificate window, click the Share icon, select PDF and print the certificates as needed.
When generating certificates from the cogwheel in either the Classes or Enrolments windows, remember that Not Set outcomes will not be included. If all related outcomes are Not Set then a certificate will not be produced.
Certificate generation logic
Here is a quick explainer of the logic onCourse uses to determine whether a statement of attainment, full qualification or certificate of attendance should be generated when certificates are generated manually via the cogwheel:
Full Qualification
Created when the course modules are marked as sufficient for a full qualification, and that the outcomes have either of the following statuses - competency achieved, RPL granted, credit transfer or RCC granted.
Statement of Attainment
Created if the course modules are marked as sufficient for a full qualification but at least one of the outcomes is not marked as complete. This will show a dialog box asking if you’d like to create a statement of attainment which a checkbox in it. Mark the checkbox to create a statement of attainment. If the check mark is not checked, nothing is created. A Statement of Attainment is also created if the course modules are not sufficient for qualification, regardless of outcome status.
Certificate of Attendance
is a non-VET certificate, awarded when a course has no VET modules attached. These can be awarded regardless of attendance marked during the class.
Step 2 - Verifying the Certificate
Manual verification prior to printing
Certificate records in onCourse can either be full Qualifications, Statements of Attainment working towards a Qualification, Statements of Attainment with no qualification reference, or a Statement of Attainment for a skill set.
If you have created the certificate from the course or enrolment cogwheel process, onCourse will select the most appropriate certificate type based on the course settings and the student’s outcomes. For example, if a student enrolled in a complete qualification has one or more outcomes not set, a Statement of Attainment, rather than a Qualification will be created for them. You may need to add the missing outcome status and then change the certificate type to 'qualification or skill set' prior to printing.
You should confirm the certificate record was created automatically is of the correct type prior to printing as this cannot be changed afterwards.
It is worth noting, that as with the course set up process, onCourse does not contain any reference data to determine if a full Qualification is valid or not. It is up to you as the certifying RTO to ensure when you create and issue a certificate record you have deemed a qualification, the student has achieved sufficient outcomes those outcomes are attached to the certificate record.
You can also choose to attach unsuccessful outcomes to the certificate record, for example, outcomes where the student has withdrawn or been deemed not yet competent. These outcomes will print on the accompanying transcript that is generated when you print a certificate, but will not print on the Statement of Attainment certificate face.
Only successful outcomes will print on the certificate face.
If you wish to alter the Awarded on date from the default date the record was created, or the Issued on date from the default date the certificate was printed, you should do this prior to printing. These fields can be changed after printing if you notice the dates are incorrect, and the certificate reprinted.
Add any public notes that you wish to display on the certificate face, such as information about the funded program that this certificate was delivered under, or the language the training was delivered in if not English, need to be manually added during the pre-printing verification process. There is no automatic population of this data from anywhere in onCourse. You can add information to this field, and the private notes field, after printing if you require, and reprint the certificate.
Certificate record verification during printing
When you attempt to print a certificate created in onCourse, the following verification checks will take place. If the certificate is not valid, you will not be able to print it until you have corrected the data.
- You can attach any outcome from a student’s transcript to the certificate record, but if you attach an outcome where the status has not yet been set you will not be able to print the certificate. Update the outcome status in the student’s record first, then attempt to print again.
- If a certificate record contains all unsuccessful outcomes e.g. 40 withdrawn, it cannot be printed. You may choose to delete this type of certificate record.
- As of 1 January 2015, it is mandatory for all student’s being issued a VET certification to have a verified USI on record. During print attempts, a check is conducted against the student record and, in the abscence of a verified USI, the print process may be denied. If the student doesn’t have a USI or doesn’t have a verified USI, an access control option can allow you override this restriction and print the certificate. More information is available in our USI chapter.
Revoking Certificates
On occasion a printed certificate will contain an error, like a misspelled name.
After printing a certificate, if you determine the certificate was printed in error, you can choose to revoke the certificate using the cogwheel option. This maintains the certificate reference in the database, with a note as to why you have revoked it.
A revoked certificate cannot be printed, but other valid certificates can be reprinted at any time. The last date you printed the certificate is automatically recorded in the certificate record.
Step 3 - Printing Certificates
To print a single certificate, go to the Certificates list view then hit the share button. Select the type of certificate you’d like to print and the background you’d like to use, then hit Print. A PDF version of the certificate will appear for you to print off for a student, or attach to an email to send to them.
Customising the layout of your VET Certificate template
The certificate templates in onCourse contain the information about the certificate that is stored in the onCourse database, like the student name, qualification name and code and unit names and codes.
Your RTO contact and registration details, logos, other required certificate logos and any other fixed visual elements in a printed certificate template should be in your background document.
When you print a certificate record from onCourse, the onCourse certificate record information is overlaid on your background document to create a AQF compliant certificate. You can store multiple report background types in onCourse to use during printing.
Certificate Backgrounds
The standard Qualification report includes a second report, the transcript, as the second page while a Statement of Attainment is only a single page report.
If you already have a certificate background you have had professionally designed, which you order from the printers, you can choose to embed this background in the report. You should request a A4 PDF of your backgrounds from your designers first.
If you do not have a professionally designed background, you can easily create your own using a simple word processing tool. Keep in mind the ASQA guidelines for issuing certificates and the appropriate use of the formal logos, when designing your backgrounds.
You will also need a second page PDF background for the transcript report.
If you create and upload a two page PDF, comprised of your Qualification background design followed by your letterhead or transcript design, for example, these pages will be used correctly when printing the combined report from onCourse. If the transcript is more than one page long, the second page of the template will be used for the subsequent pages printed.
If you are printing Qualifications in bulk, onCourse will recognise when the student record has changed to the next student and therefore apply the first page of the PDF background again as this is a new Qualification.
When creating a background for a Statement of Attainment report, only a single page background is required.
On occasion, Statements of Attainment may contain reference to more units that can fit during printing on a single page. In this instance, the report will be split into multiple certificate pages. Each certificate number will be appended with a page number on printing e.g. certificate 472 may display as 472/1 and 472/2 if multiple pages are created.
If you are manually printing a range of Statements of Attainment and Qualifications to the printer at a time, and you have different backgrounds for these reports, you need to print them in two groups - once group the Qualifications with their background chosen, the next group the Statement of Attainments with their background chosen. If you use the onCourse automated script to run the print and issue process, the correct background will be selected automatically.
There is more information about how you can create and update report backgrounds in reports-printing.
Certificate signatory name and title
You can update the signatory name for your Certificate reports via the AVETMISS tab / General Preferences settings of onCourse. Remember that this field will appear as one line on your Certificate report, so you would add the name and title of the nominated signatory name in the one line. Go to the Preferences window and click on the AVETMISS section and add the name to the 'Full certificate signatory name' field. Whatever content you add to this field, will appear automatically within your Certificate Reports, unless your custom report has this information hard coded into it.
If you require a different layout for the signatory fields i.e. two names, name and title on separate lines or embedded digital signature, we recommend you put all this data in the background and remove the signatory details from the onCourse report templates.
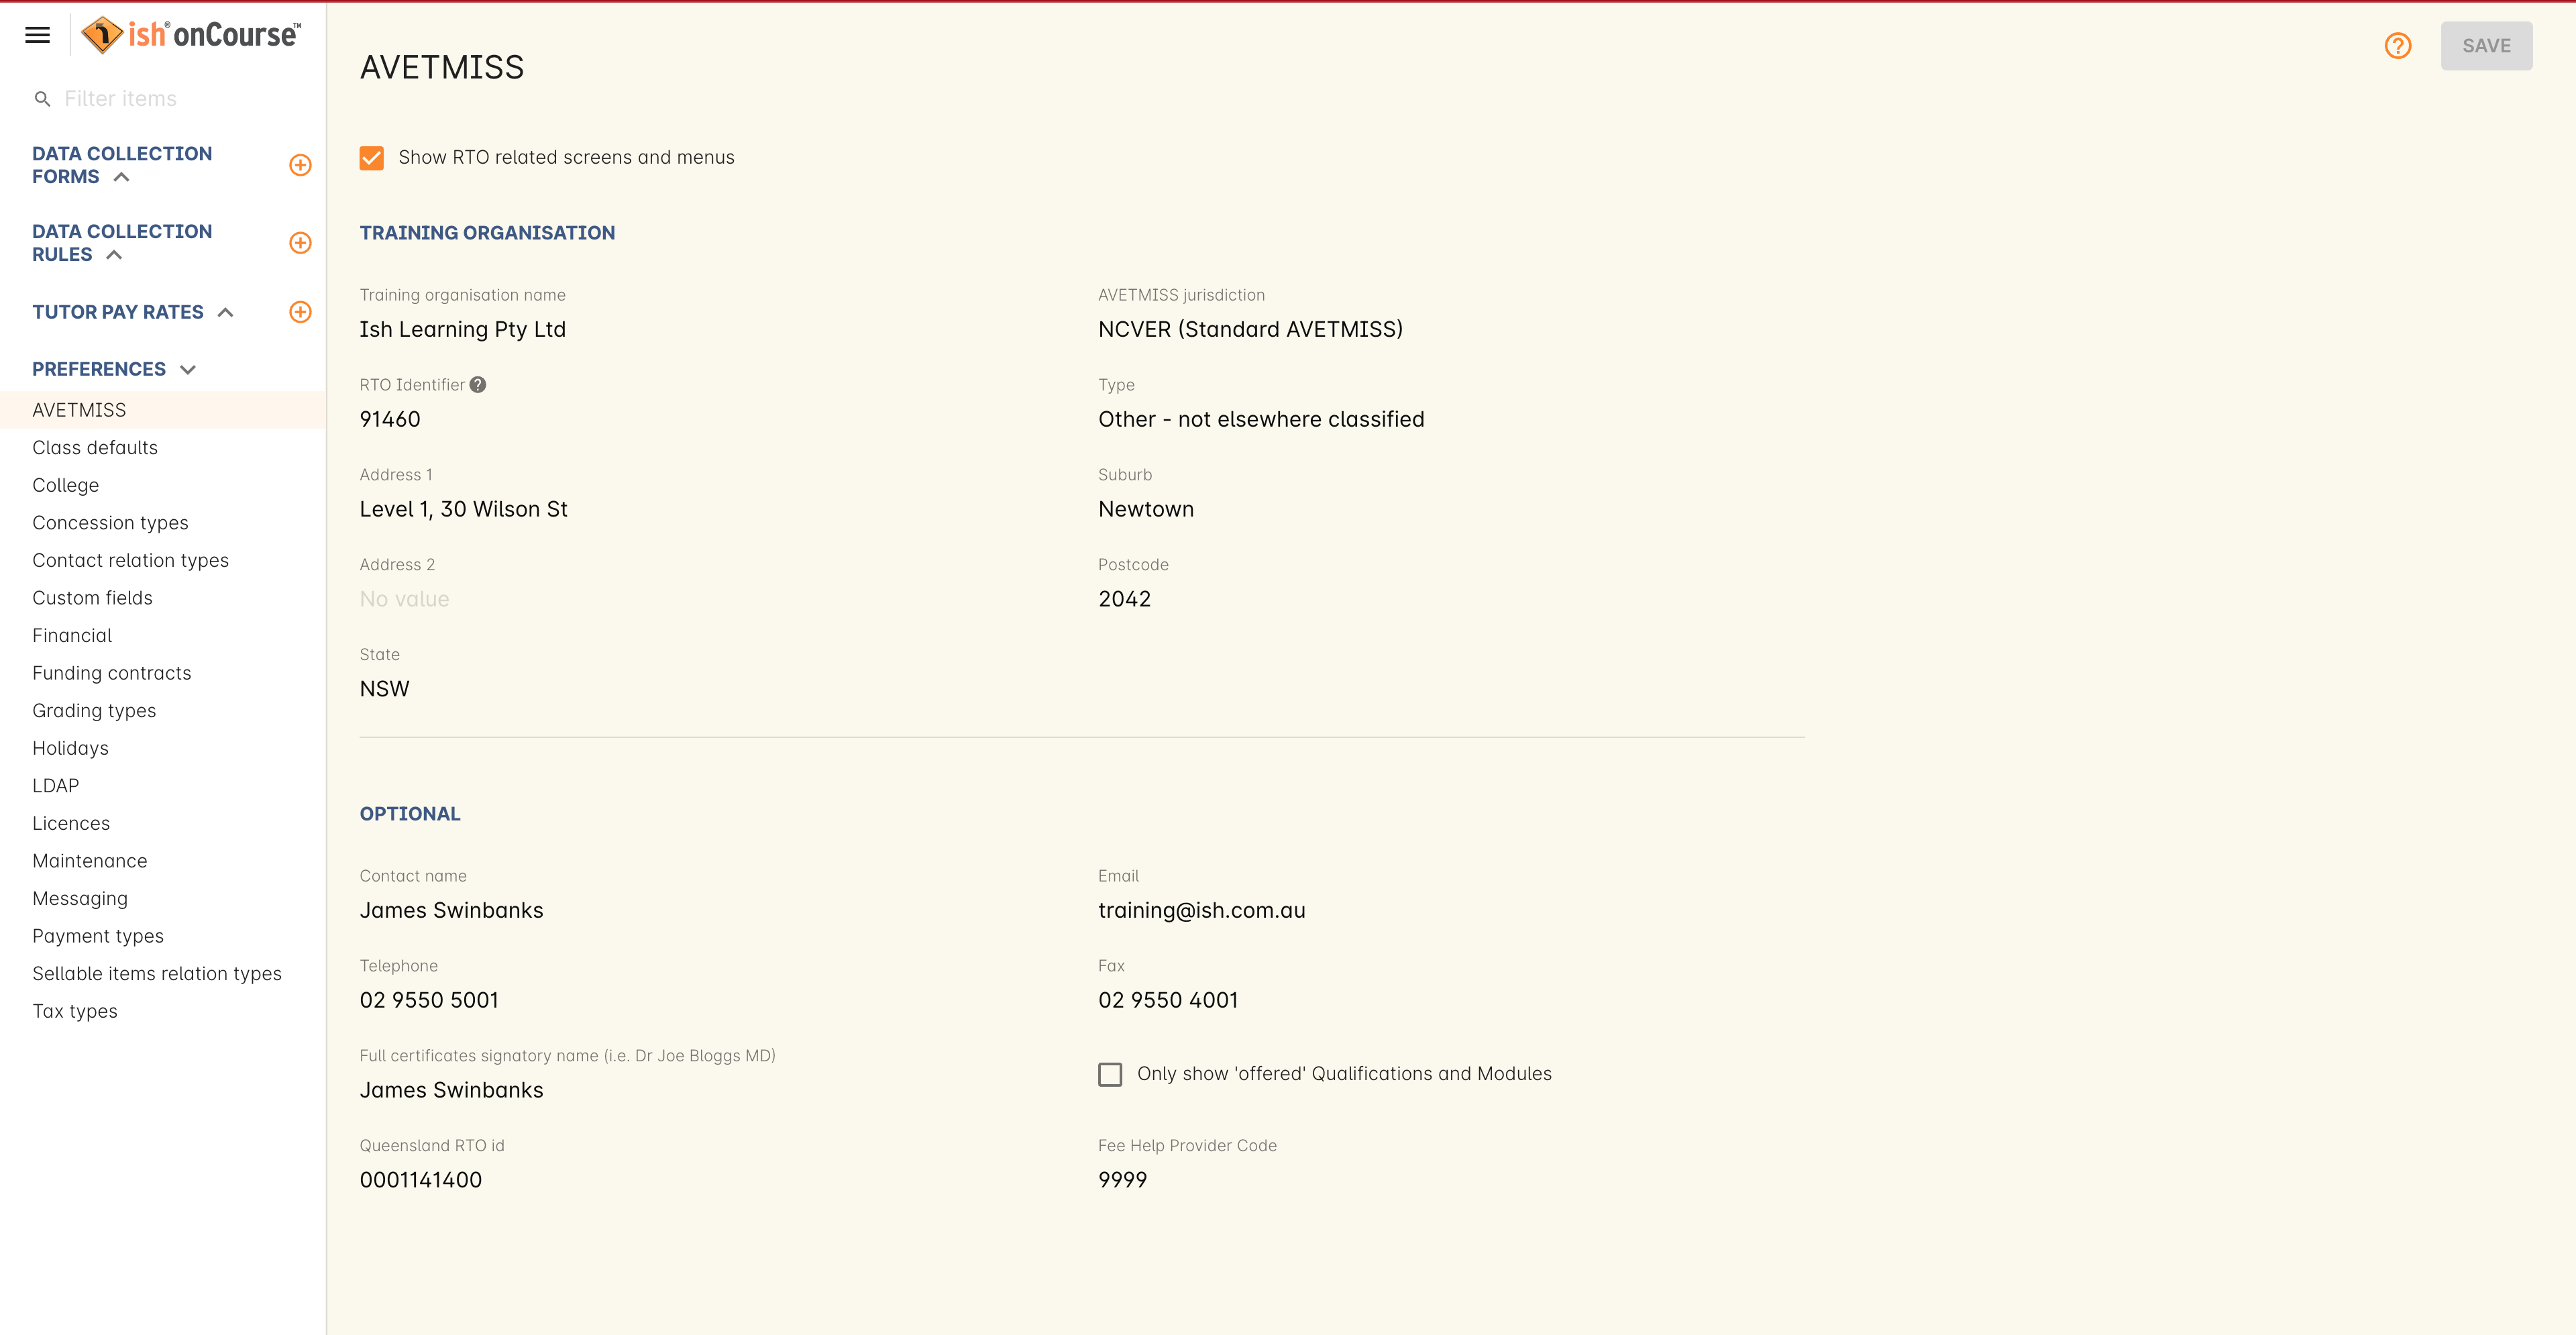
Figure 421. Updating signatory name via General Preferences
Changes to the report templates
Within the onCourse user interface, you can make some simple customisations of your certificate template wording.
More detailed customisations require you to edit the report outside of onCourse.
If you wish to make other changes to the fixed wording, the font sizes or styles or embed any other images into the certificate templates, then you will need to modify the report files outside of onCourse.You can do this yourself, or you can request a quote from ish to do this for you if you are on any of our support plans.
There is more information about custom reports in our reports chapter.
Printing Certificates with QR Codes
By default, the onCourse Statement of Attainment and Qualification Certificate templates print with an embedded QR code and unique URL for online certificate validation through the onCourse Certificate Verification Service.
This service allows employers or other RTOs to verify the issuing data presented to them in PDF or paper format against the RTOs records, without having to make personal contact with your admin staff. The end user can scan the QR code, or visit the www.skills.courses URL and type in the verification code. They will then be shown the name, qualification and/or units of competency that the certificate was issued for, plus the issuing date and issuing RTO details.
This online validation service allows you to meet your RTO obligations to ensure your Certification process is secure and difficult reproduce in a forgery context, and also to make your certification documentation accessible to past learners.
If you do not wish to print certificates with QR codes you can uncheck this option during the print process.
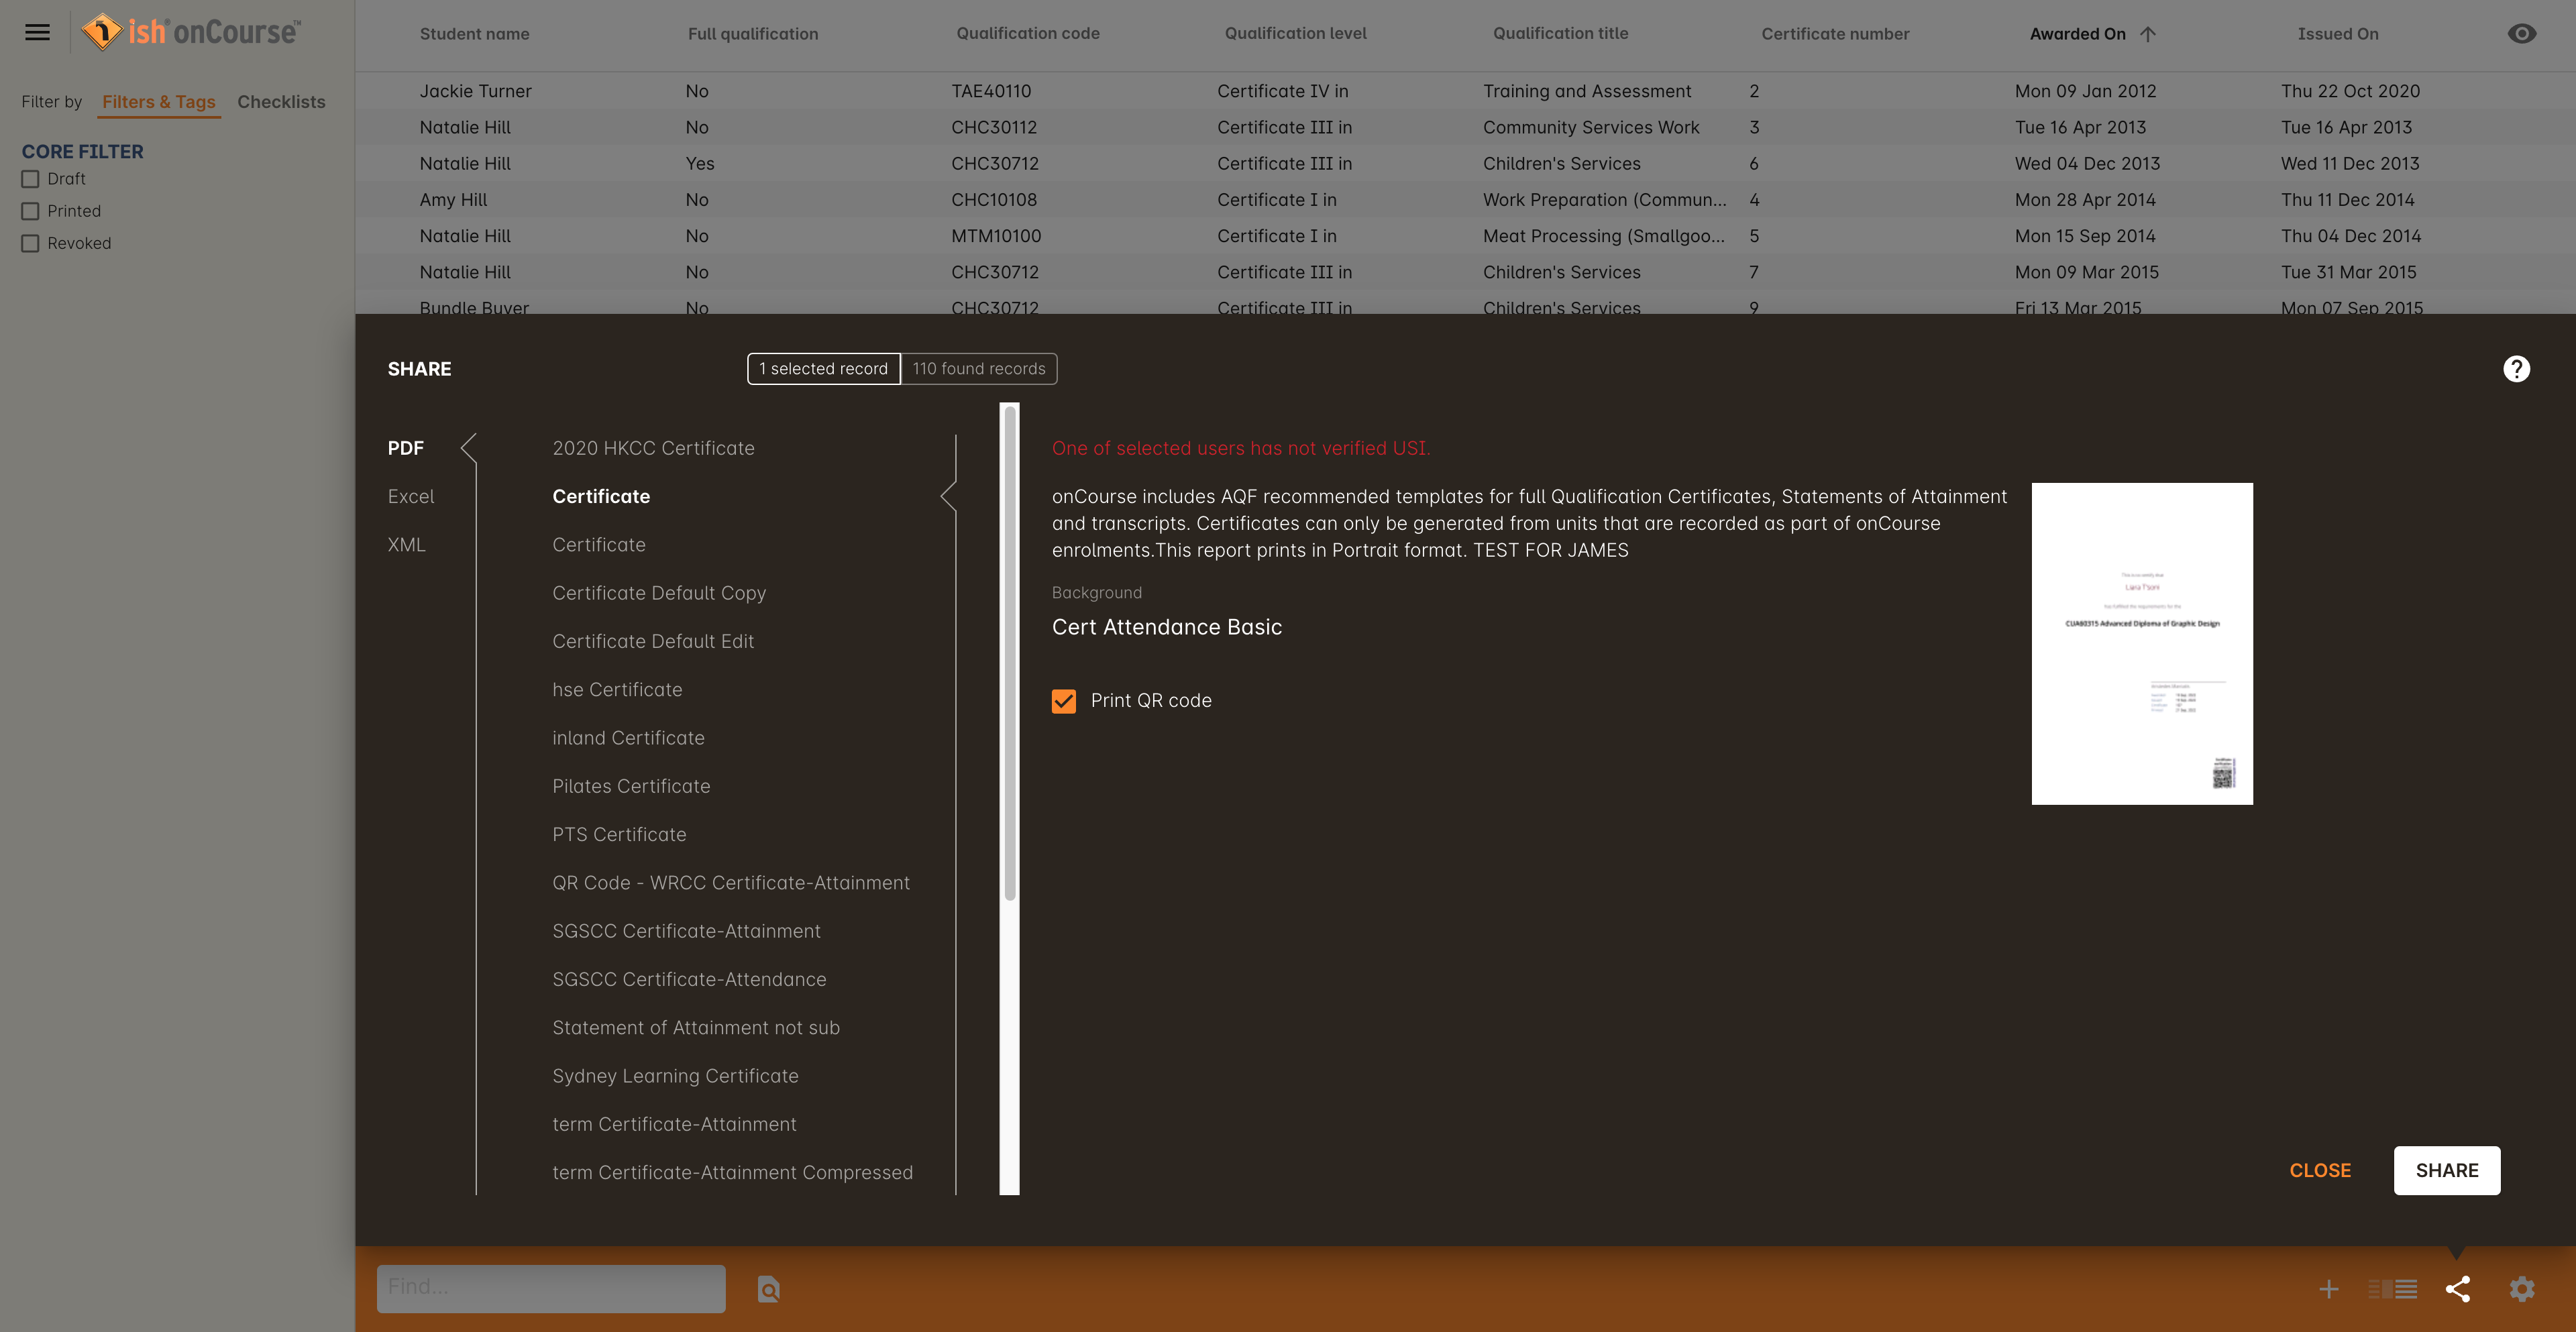
Figure 422. Printing a certificate with the QR code option enabled
Examples of default Certificate layouts
Standard Qualification
To create a qualification for a student you need to ensure the following:
-
If you are creating the Certificate directly from the class or the enrolment, the course has to have the option 'satisfies complete qualification or skill set' checked and be linked to a qualification by its national code to create a certificate of type 'qualification or skill set'.
-
You need to manually confirm that the qualification record you are creating meets the training package requirements, by adding sufficient and valid units of competency from the student’s record which they have completed successfully.
-
When you print a Qualification you will also print a transcript which shows the outcomes status of each unit you have selected. Unsuccessful outcomes you have added to the certificate record will also print on the transcript. It is your choice to add these to the certificate record or not, depending on your organisation’s policies.
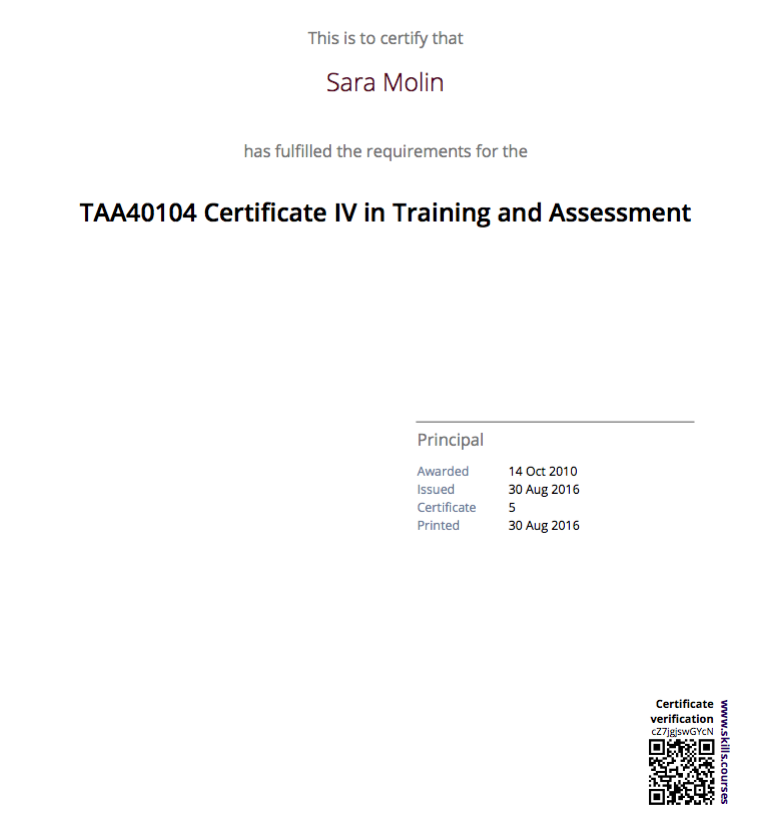
Figure 423. Standard Qualification Certificate layout without a print background
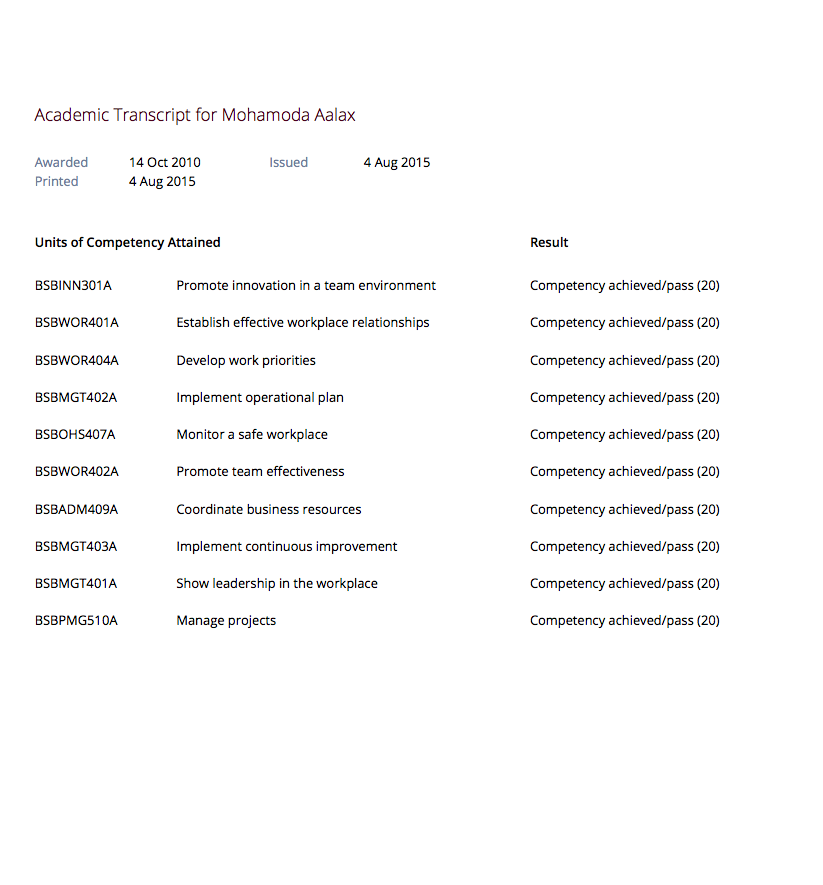
Figure 424. Standard Transcript layout without a print background
Qualification for a Traineeship/Apprenticeship
As per the instructions above for creating a standard Qualification, you can modify a qualification certificate record to show the text 'achieved through Australian Apprenticeship arrangements' by entering this text in the public (printed) notes field in the certificate record.
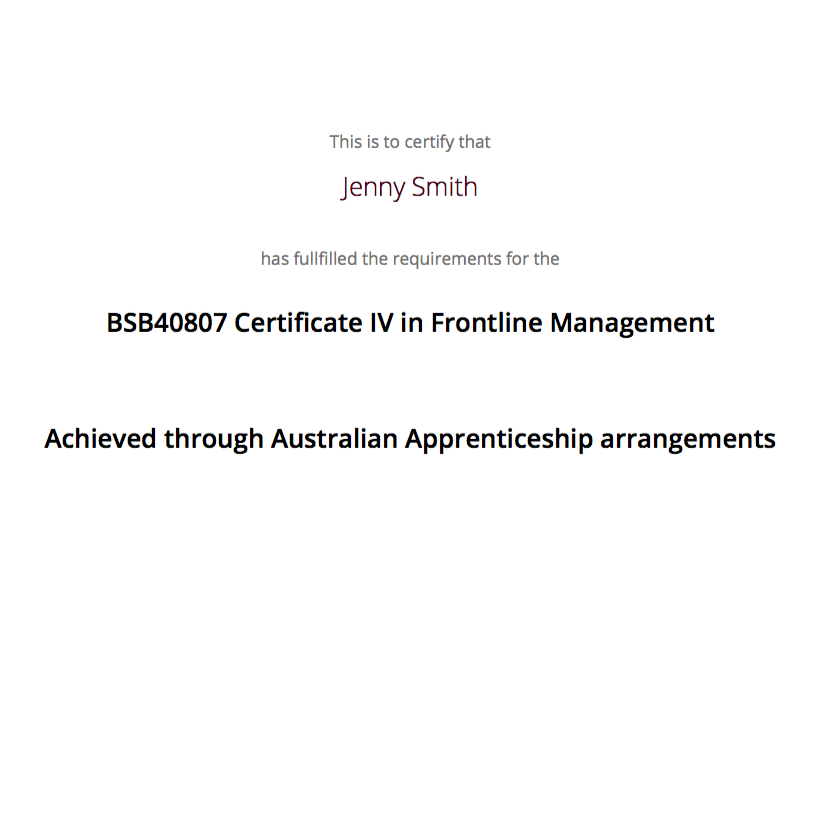
Figure 425. A qualification achieved via an apprenticeship arrangement
Statement of Attainment with qualification reference
To create a Statement of Attainment that references a qualification to need to ensure the following:
-
If you are creating the Certificate directly from the class or the enrolment, the course has a qualification defined, and 'satisfies complete qualification or skill set' is not checked you will create a Statement of Attainment record linked to a qualification. If you have not defined the reference qualification in the course, you can define this in the certificate record before printing.
-
Any unsuccessful outcome you add to the certificate record will not print on the certificate face, but will print on the accompanying transcript.
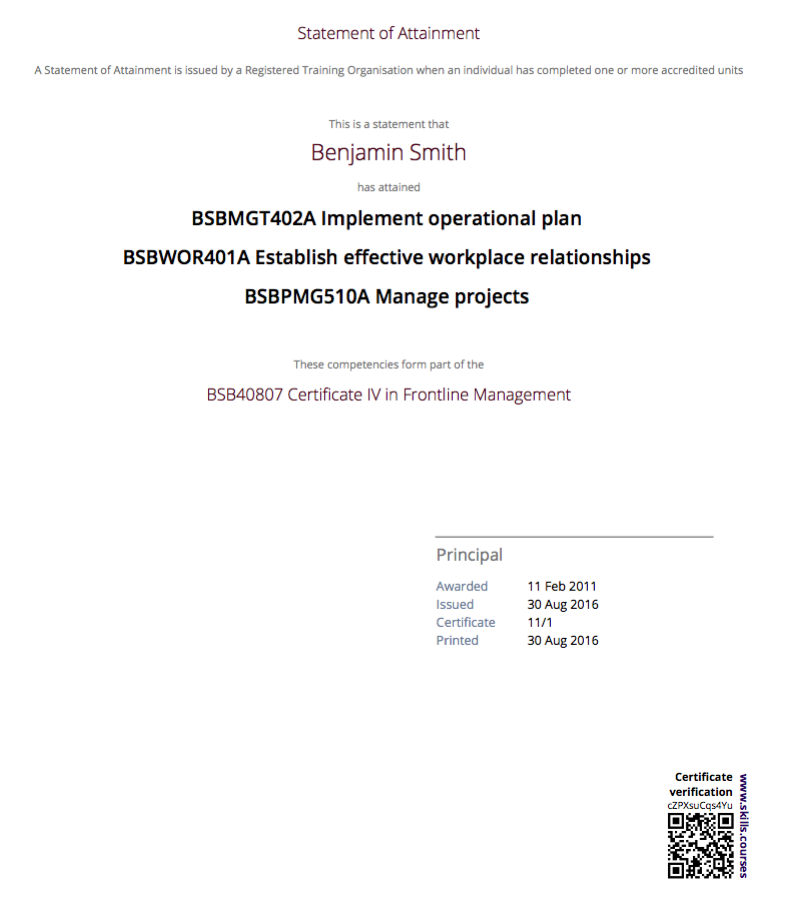
Figure 426. Standard Statement of Attainment layout with reference to a qualification
Statement of Attainment without qualification reference
If you wish to create a Statement of Attainment that doesn’t include a reference to a qualification, you need to ensure that National Code field is left blank in the certificate record. Otherwise the instructions are the same as above.

Figure 427. Statement of Attainment layout without a reference to a qualification
Skills Set Statement of Attainment Certificate
A skill set is a relatively new concept of a fixed grouping of units of competency to meet an industry need, that are less units than completing a whole qualification. Skill sets are defined by Training Packages and available on training.gov.au, and their names and codes are automatically downloaded into onCourse, along with units of competency and qualifications. You could think of a skill set as a mini qualification. In onCourse, they are treated similarly to a qualification, as in a student has to be competent in all the skill set outcomes to be issued a complete skill set.
Like a qualification, completed skill sets are reported in the AVETMISS NAT00130 file. Normal Statements of Attainment are not reported.
If the course has been defined as being a 'complete qualification or skill set', and the student has successfully completed all the units of competency, then onCourse will attempt to create a skill set certificate for the participant.
If you are manually creating a skill set certificate, you need to select the option inside the certificate window 'qualification or skill set' rather than Statement of Attainment, even though a skill set is a type of statement.
On training.gov.au, each skill set includes suggested words for the Statement of Attainment. If you wish to add these words to your printed certificate, be sure to copy and paste them into the Certificate public (printed) notes fields.
Below is an example of a Skill Set Certificate record, and a printed copy of the certificate using the default onCourse template with no background.
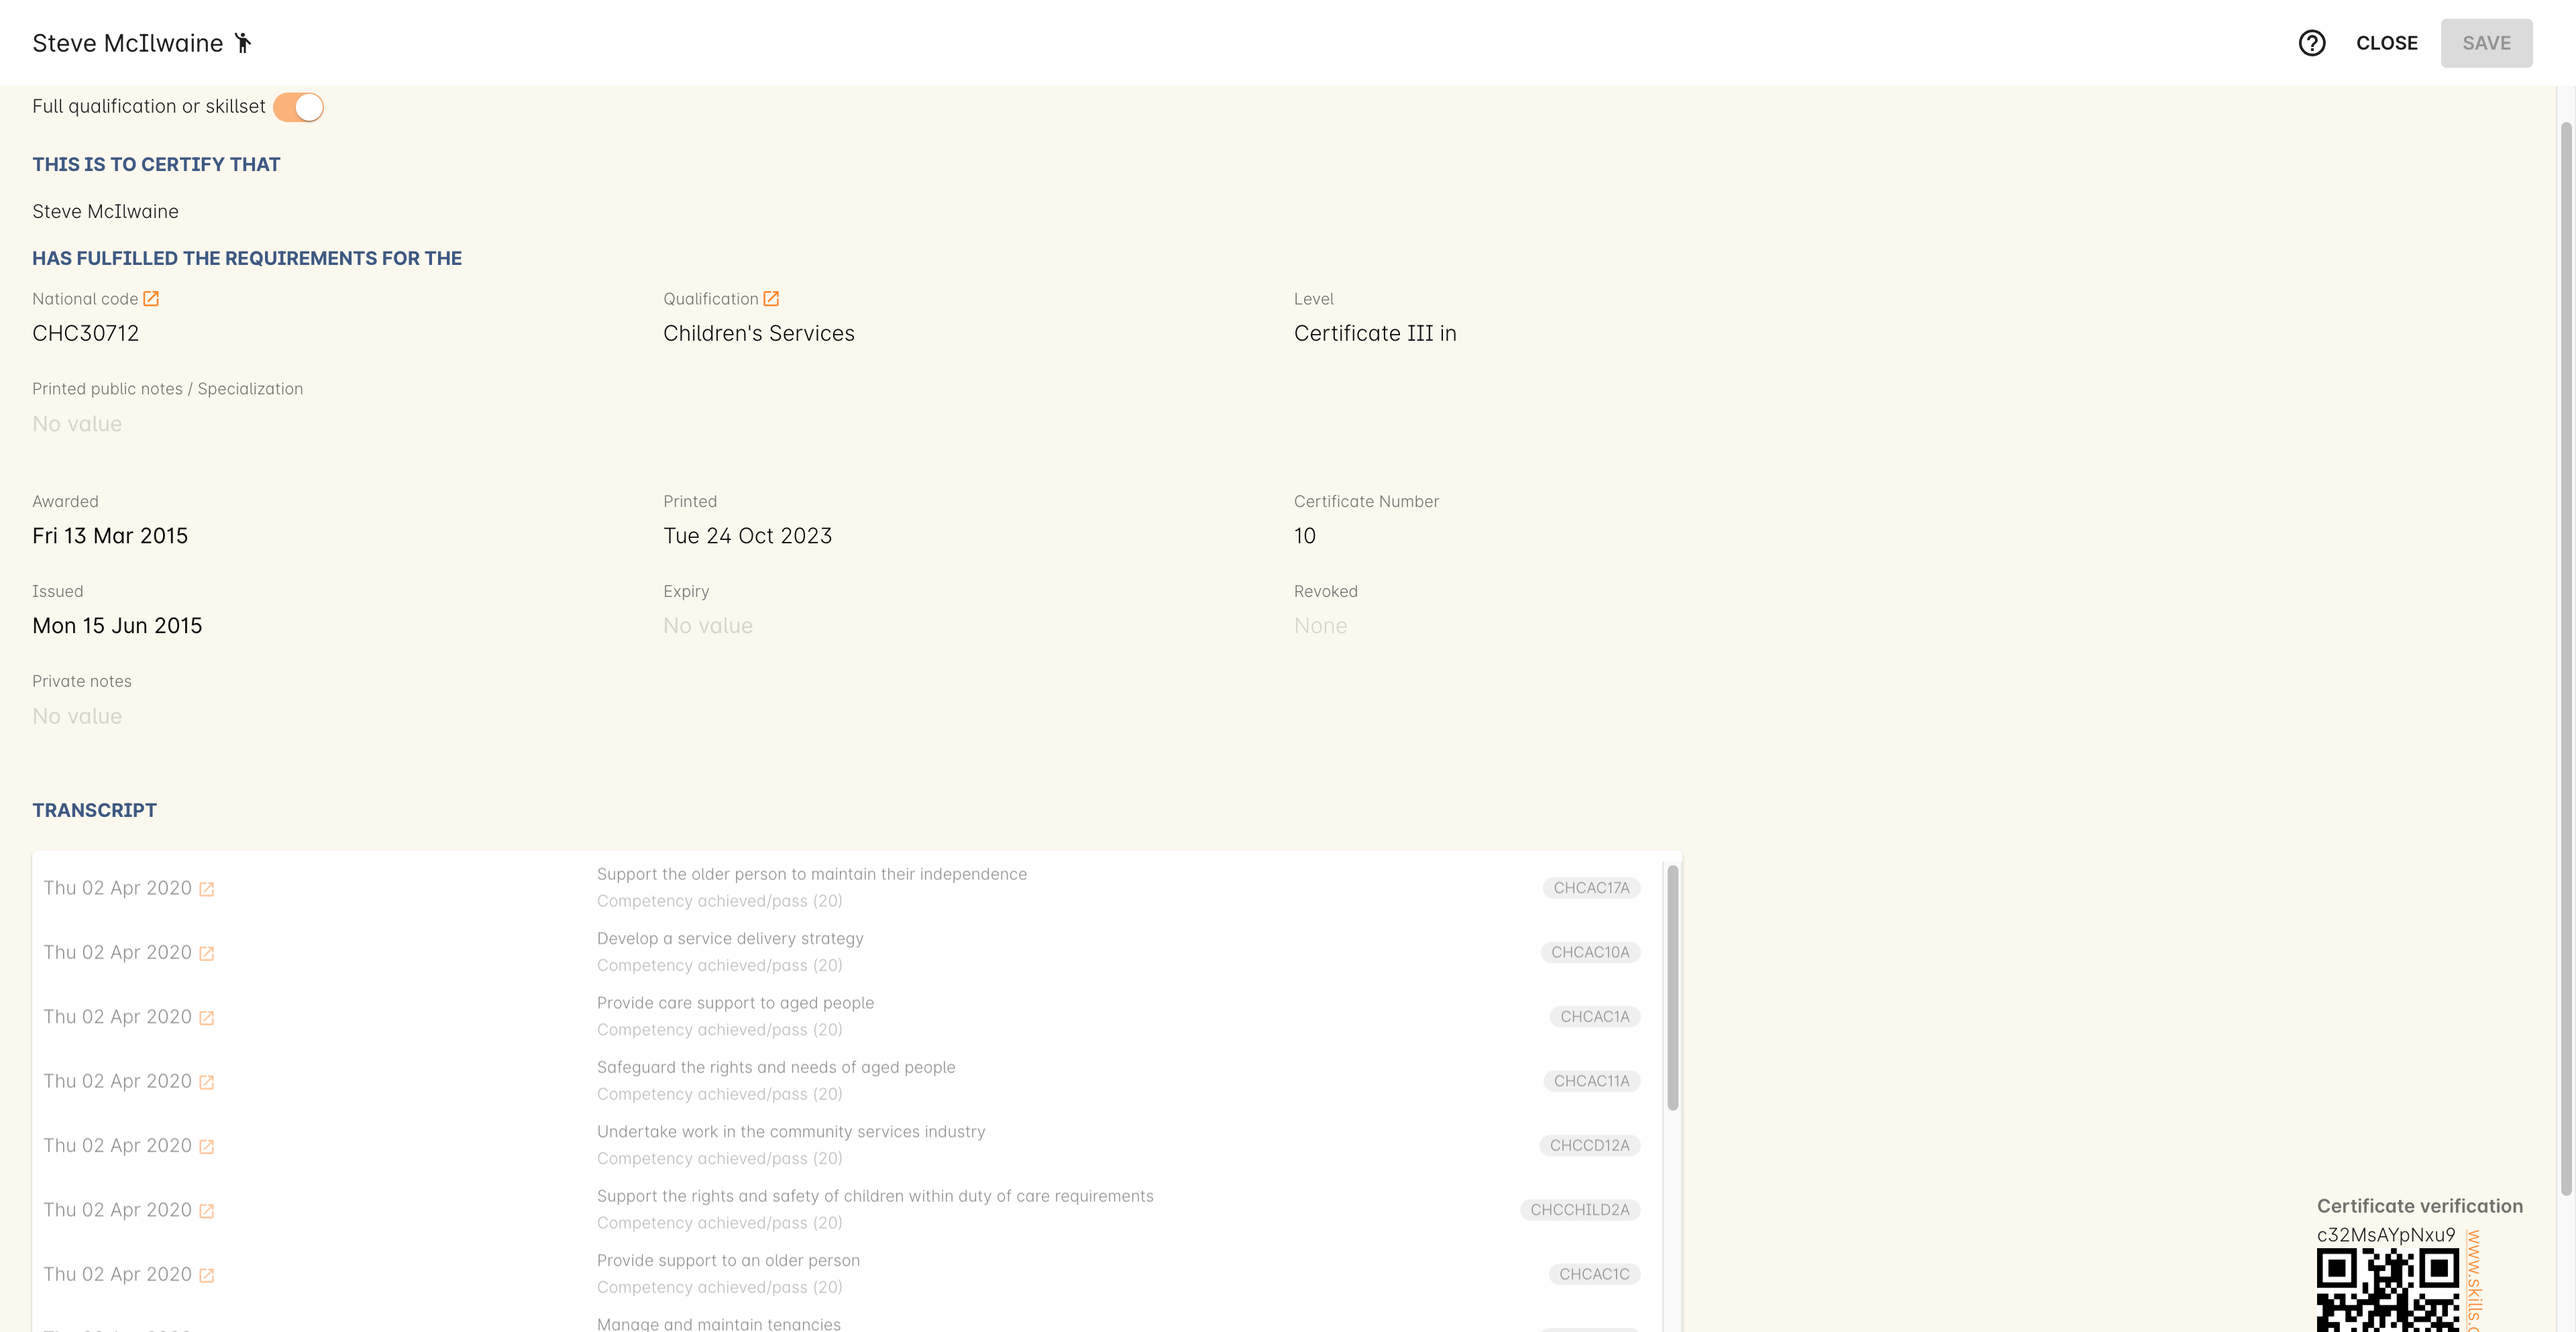
Figure 428. A Skill Set certificate record
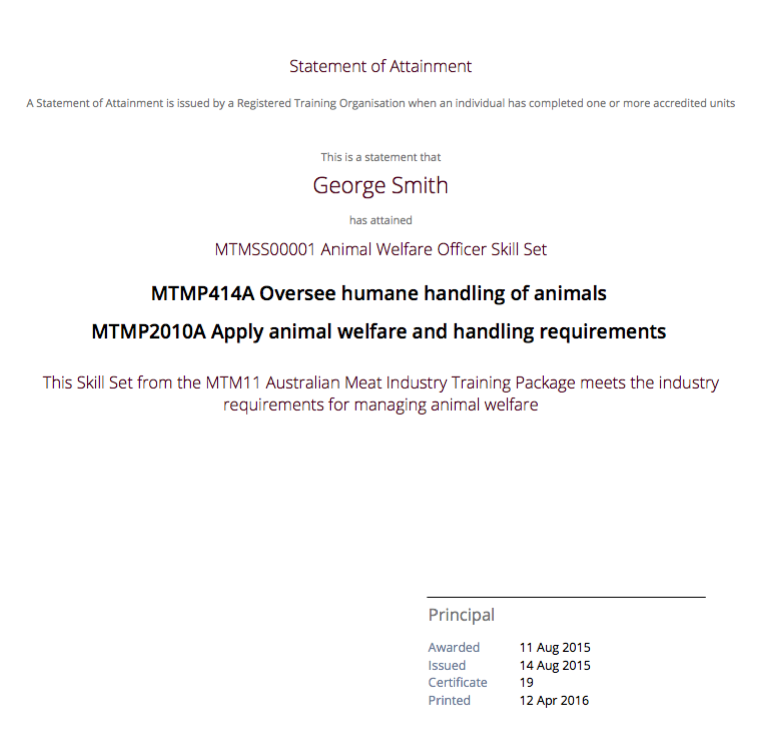
Figure 429. Statement of Attainment layout for a Skill Set Certificate without a background
Certificate Distribution
If you wish to distribute your VET Certificates electronically, you can either enable the default onCourse script to schedule this print and distribution process automatically, or you can manually print and distribute the PDF.
Scripted Certificate Distribution
A default onCourse script called 'send certificate vet created notification' is available to enable so you can automate the printing, upload to the portal and notification to students of their VET certificate availability.
By default, this script runs at 5am each day and prints all unprinted certificates in the database, where the student has a verified USI.
Before you enable this script you need to ensure you have created and tested the printing of the certificate reports with the following backgrounds:
vet_qualification_background.pdf
This background is for printing certificates of type full Qualification.
It should be a two-page background with a certificate face page, followed by a transcript page background
vet_soa_background.pdf
This background is for printing certificates of type Statement of Attainment.
It should be a two-page background with a certificate face page, followed by a transcript page background
vet_skillset_background.pdf
this background is for printing special Statements of Attainment that are of full Skill Set type. It should be a two-page background with a certificate face page, followed by a transcript page background
This script sends the message template 'certificate available' which you should adjust as needed before enabling the script. Keep in mind this message template is also used by the script to send non-VET certificates, 'send certificate created notification', so if you adjust it, and use both scripts, then the wording needs to make sense for both VET and non-VET courses.
Alternatively, you could make a copy of this template, and use two different versions, one for each script.
When the script runs, it will send an email, with the default template encouraging the student to complete the course feedback process in the portal.
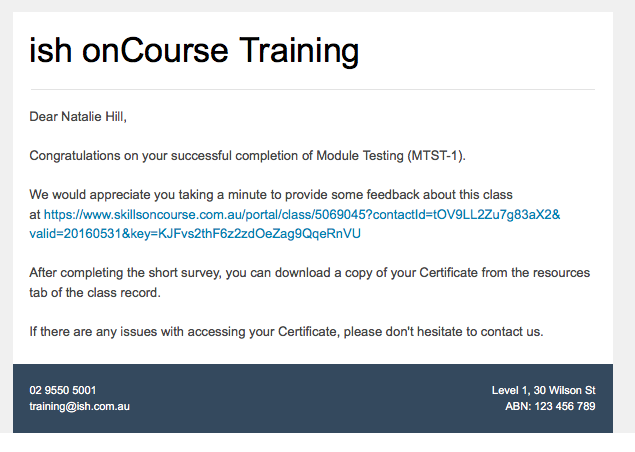
Figure 430. Email to notify the student their certificate is availab
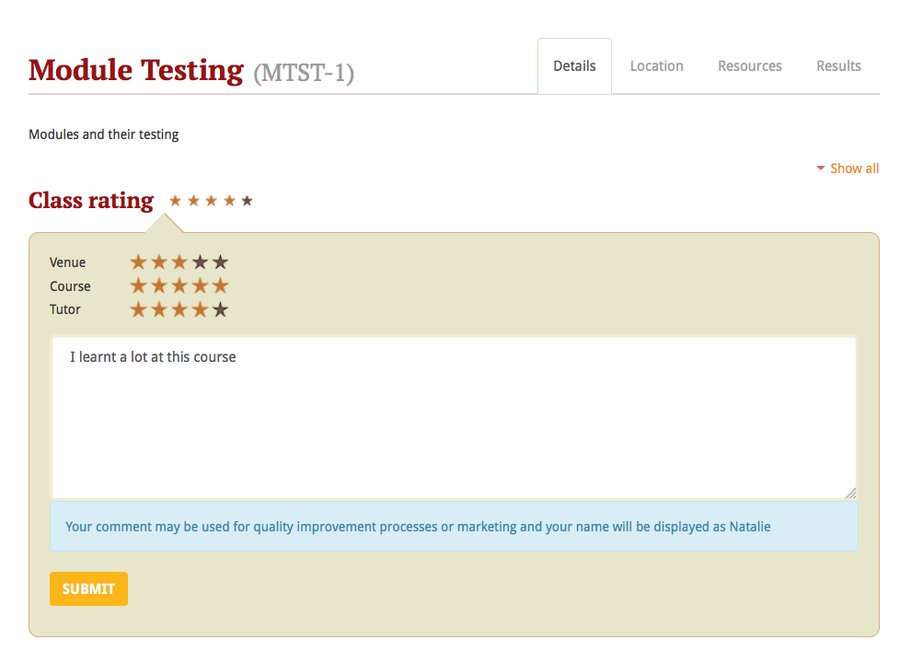
Figure 431. After clicking on the link in the email the student can provide feedback
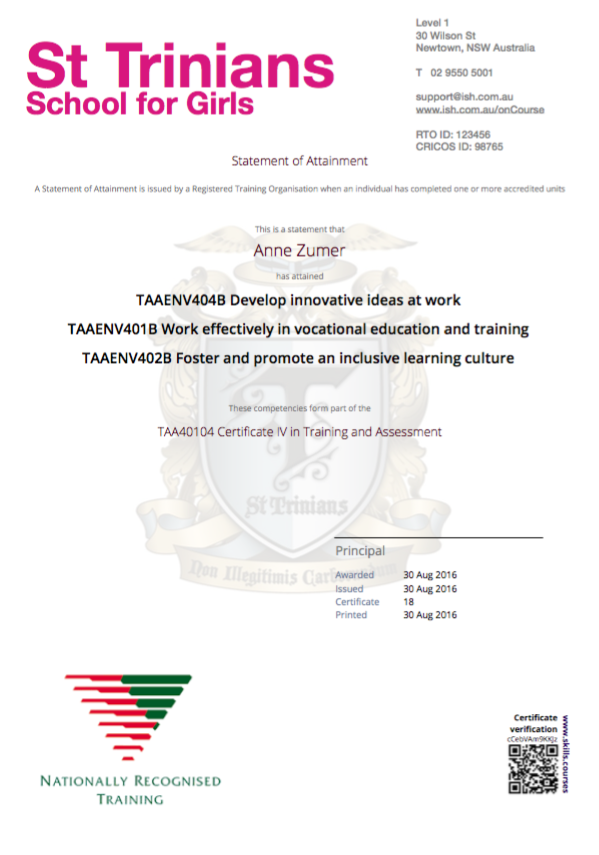
Figure 432. Statement of Attainment PDF available in the portal for the student to download or print
Manually creating and issuing PDF Certificates
Once you have printed a Certificate to PDF, you can either send the PDF as an email attachment (outside of onCourse) or attach the Certificate PDF record to the student’s Enrolment using the onCourse document management system so it is available in the student’s skillsonCourse portal. You can also send them an email with the link to access it.
-
Print the Certificate to PDF with the background of your choice.
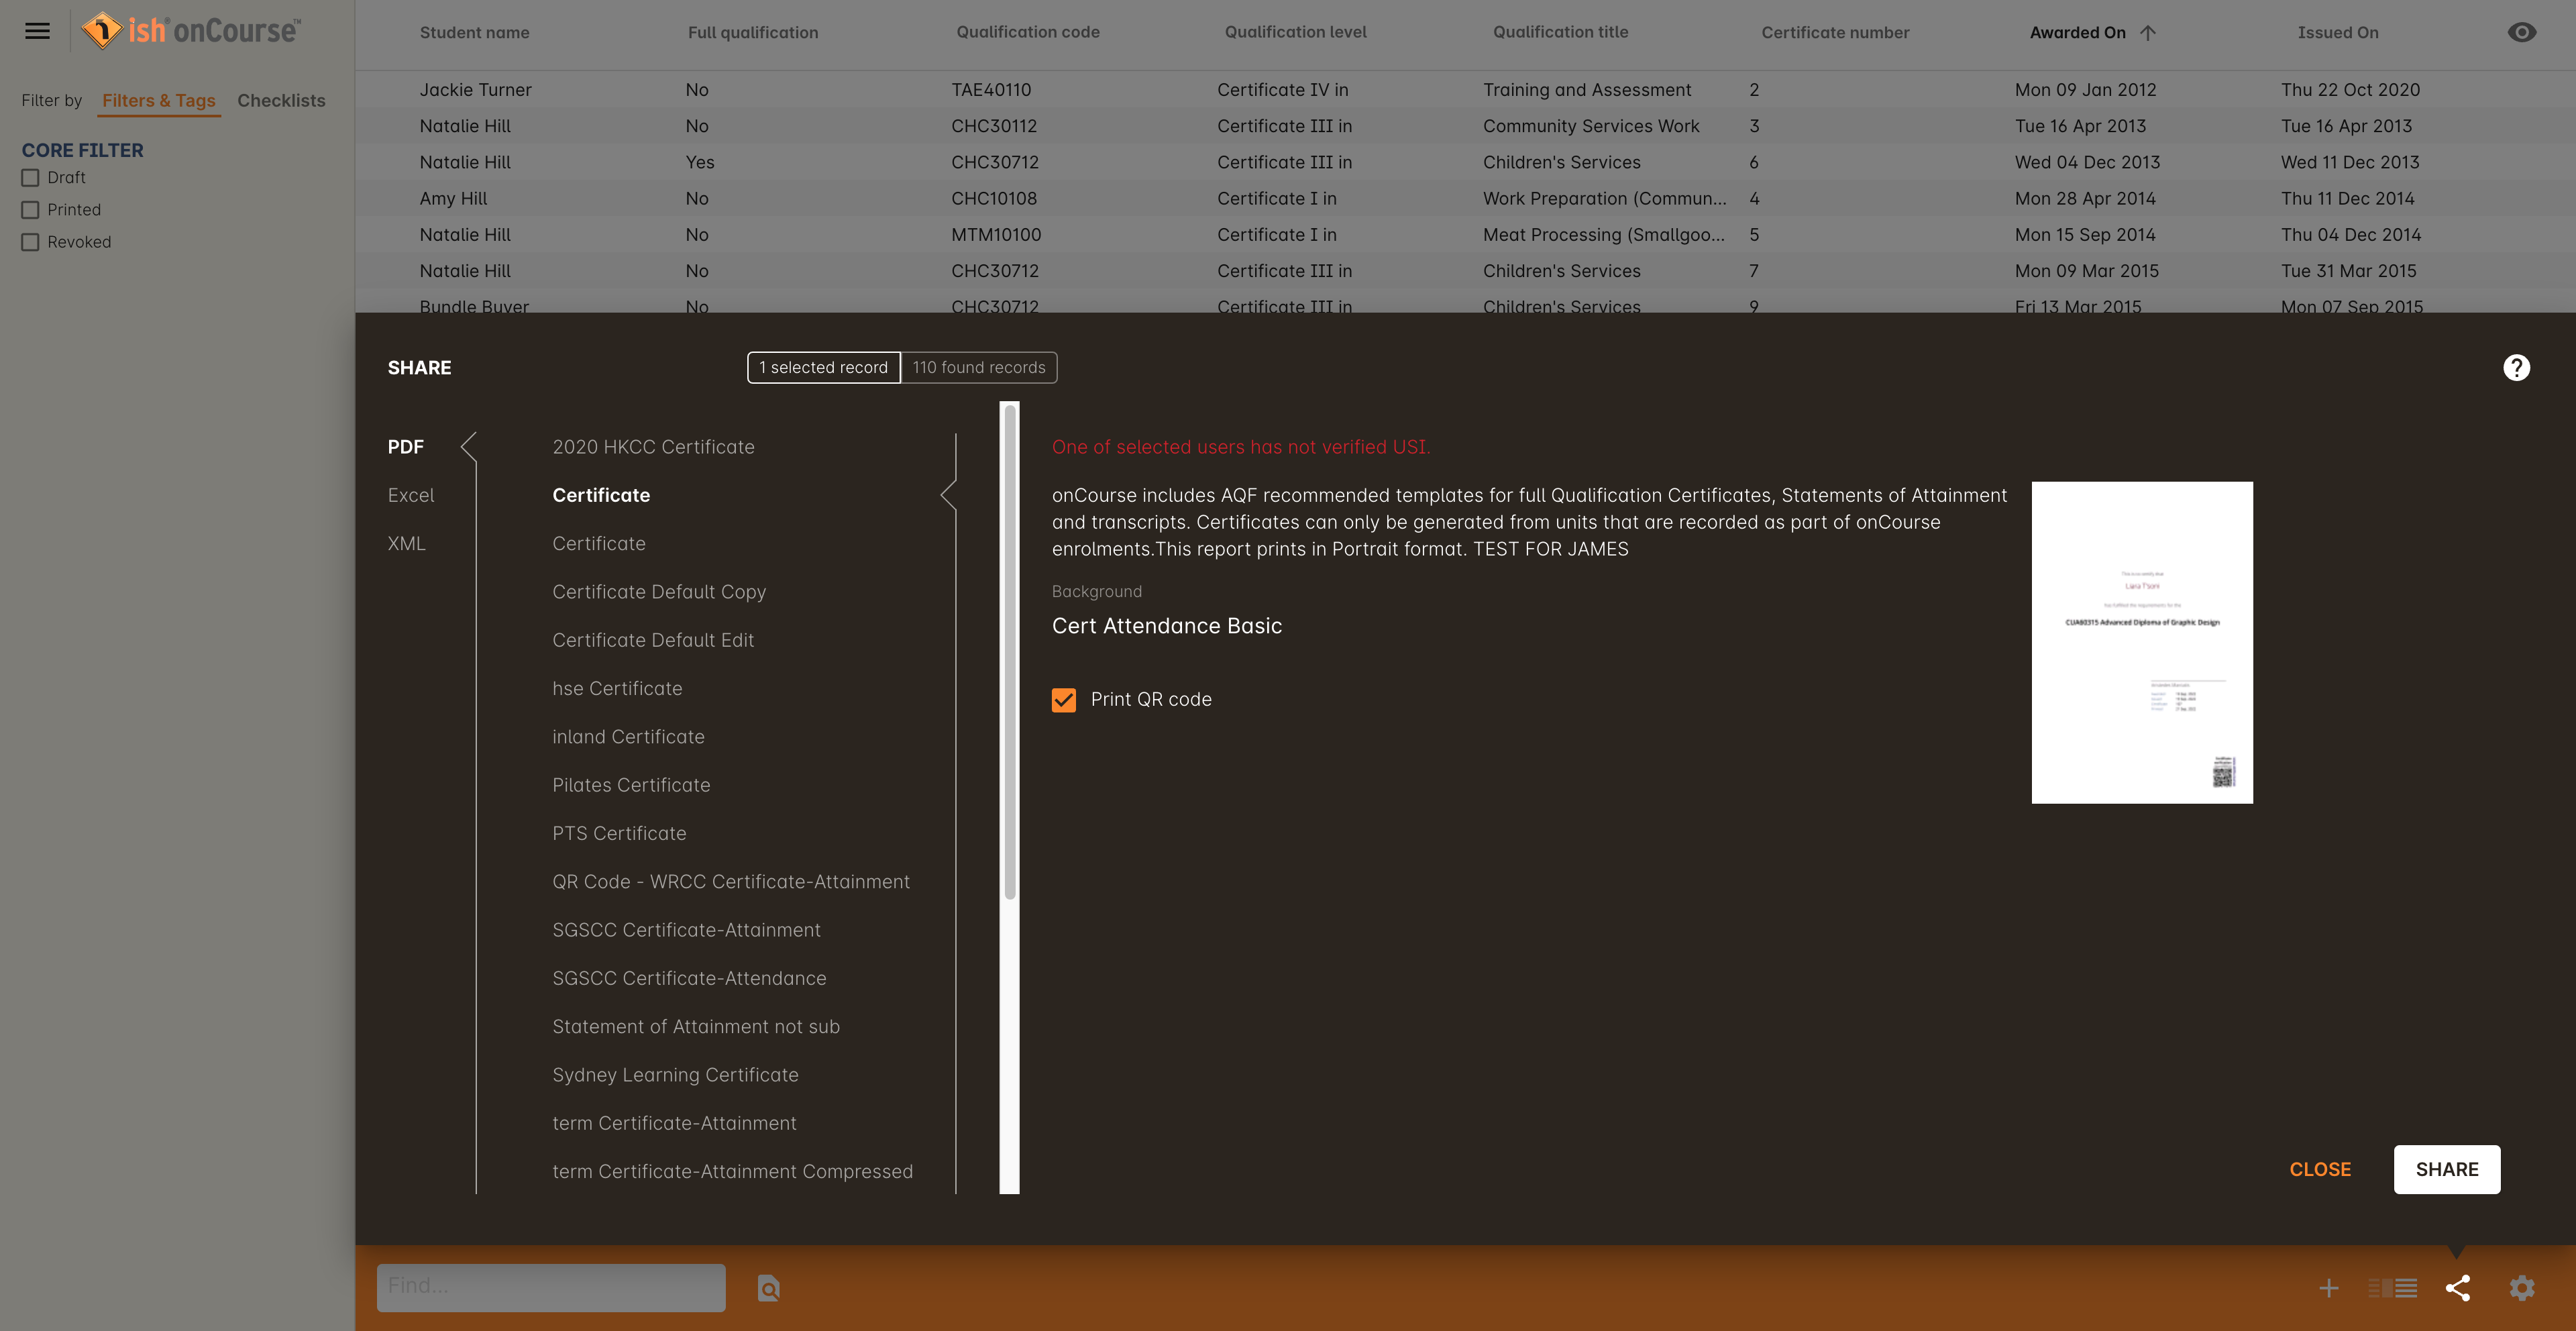
Figure 433. Printing a certificate
-
Save the PDF file to a location on your computer, and give it a name that makes sense for later retrieval i.e. the student’s name and qualification.
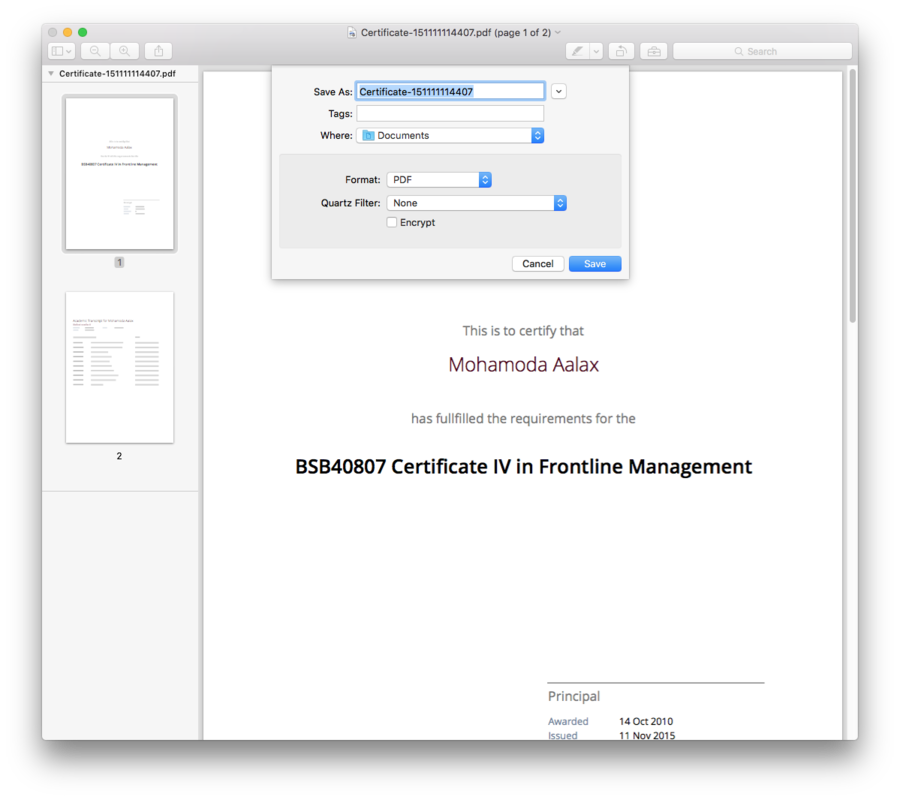
Figure 434. Saving a certificate to your computer
-
Find the enrolment you want to attach the certificate in the enrolments list view.
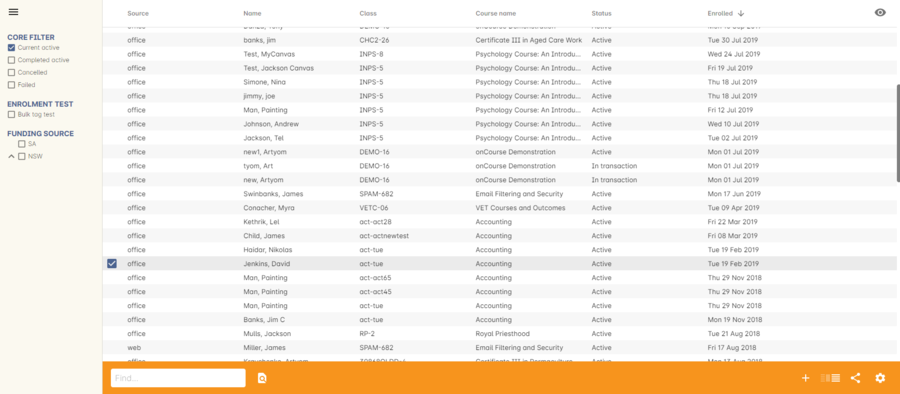
Figure 435. Enrolment being found and selected
-
Open the enrolment record and click the + button next to the Documents heading.
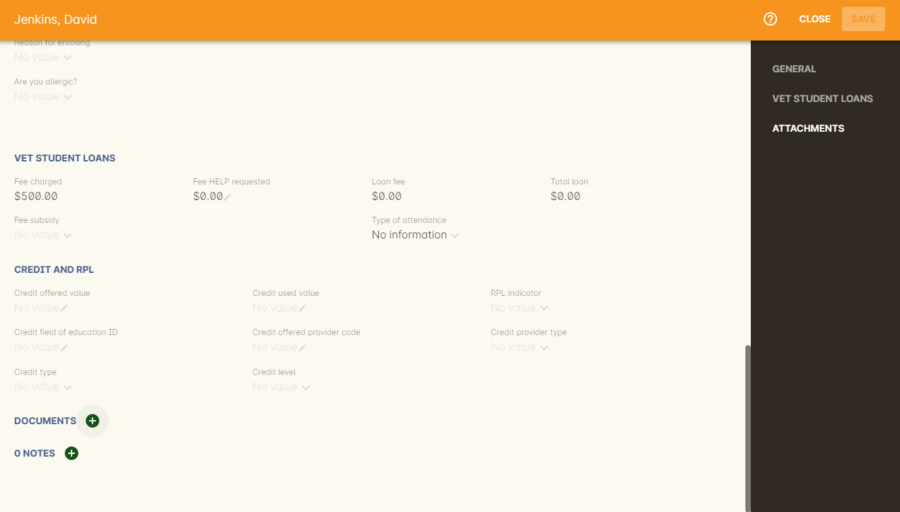
Figure 436. Attaching the certificate to the enrolment record
-
Type the name you gave the uploaded file in onCourse into the search bar that appears, it should appear as a search result to select. More information about how to upload a file can be found in our document management chapter.
When uploading the Certificate you will need to set the Access level to 'Tutors and enrolled students' otherwise the student won’t be able to see if in skillsonCourse.
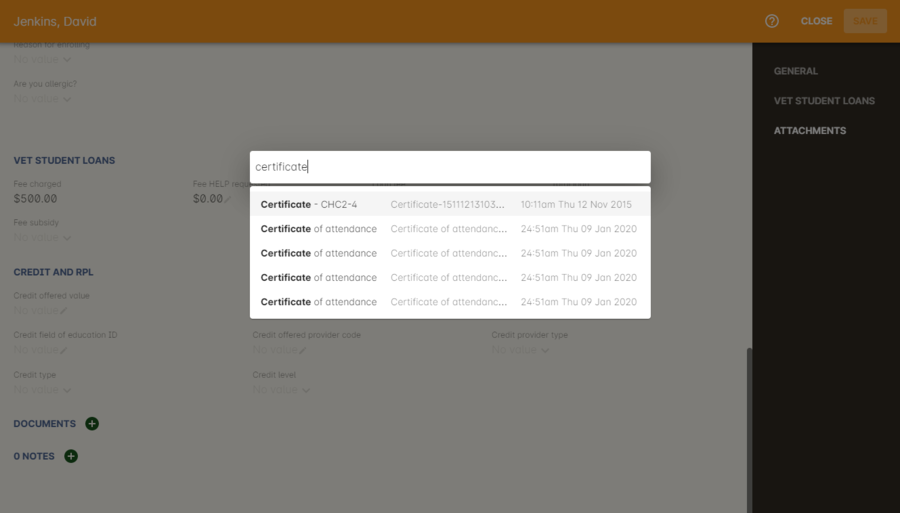
Figure 437. Searching for a certificate to attach
Once the Certificate is attached to their enrolment record, the student will be able to see the file and download it in their skillsonCourse portal. Send the student an email advising them the certificate is available in the portal.
If you create an email template to this, you can use the code ${enrolment.student.getPortalLink(document)} to send the student a login free link directly to retrieve their Certificate.
After 7 days, this login free link expires, however the student can still click the link and login to access their Certificate again at any time. If you want to extend the link beyond 7 days, to say 30 days, format the link
${enrolment.student.getPortalLink(document,30)}
Updated over 1 year ago
