Google analytics
If you want to see how your site is performing, this is the tool for you. Typical analytics shows you page view, user demographics and much more, but onCourse injects even more data into your analytics:
- Transactional sales dollars. Every sale through the website puts the dollar value into your Analytics. So not only can you see how many page views you got from that ad campaign, you can see the dollar value of the sales that generated. You’ll discover that the two aren’t always correlated. Do you care about ten thousand views from Facebook likes or the 200 real sales from a targeted campaign? This is how you can tell the difference.
- Course and products.
Drill down in your data to see where sales are coming from. Getting lots of language course sales from an ad you placed on a friendly site? Great, now you know what works and where to focus your time and money. - Events. Because we log "add to shopping basket" and other events, you’ll be able to see who is engaging with your site but not following through to the end.
- Checkout steps. You can track each step in the checkout process through a Google Analytics acquisition funnel. See where and why people are dropping off.
Google Analytics Setup
In order to get data into your Google Analytics account you’ll need to complete the following steps:
- Create a new https://analytics.google.com/analytics/web/[Google Analytics] account (or use an existing one).
Under `Admin > Property > Tracking code` look for the tracking id and make a note of it. - Log into Google TagManager and find
ish onCourse Google Analytics settingsunder variables.
Put your tracking id in there to replace the dummy one. - Back in Google Analytics, you should soon be able to the Tracking Code status update to show data coming in.
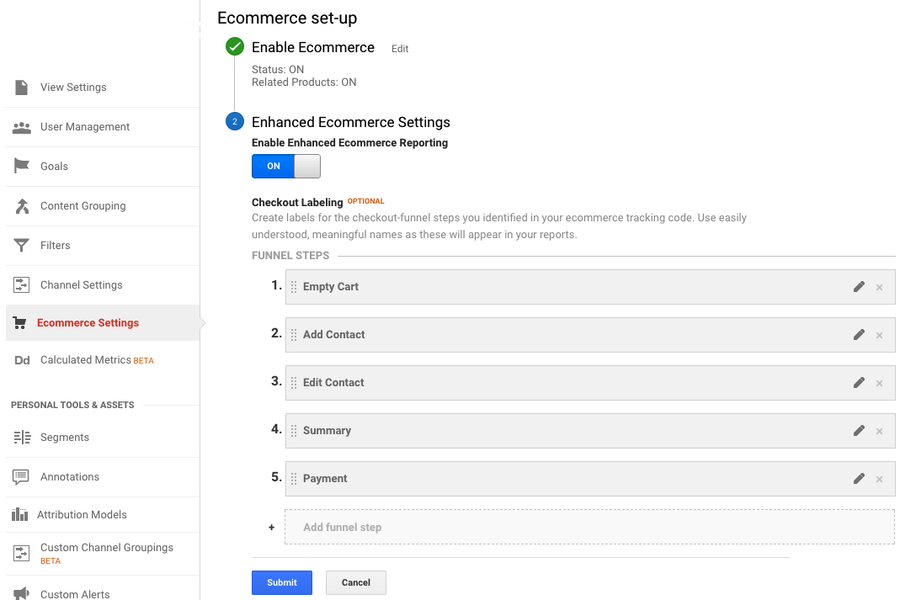
Visit your website to generate a bit of traffic. - Enable enhanced ecommerce reporting in the Google Analytics under
Admin > View > E-commerce settings - Select names for your checkout steps
- Empty Cart
- Add Contact
- Edit Contact
- Summary
- Payment
- Submit changes

When you have some time, explore the Analytics "goals" setup for ways to get useful information such as dropoff in your checkout rates.
Events
Events are sent to Google Analytics at various points in the checkout process. Along with the event, onCourse sends a rich data structure which you can then report on. The following steps are sent as events:
- Checkout step: 1 - checkout without any items in cart
- Checkout step: 2 - Add payer screen
- Checkout step: 3 - Edit contact screen
- Checkout step: 4 - Summary screen
- Checkout step: 4 option: Change Parent - change parent for child from summary
- Checkout step: 4 option: Add concession - add concession for contact
- Checkout step: 4 option: Add contact - add contact from summary
- Checkout step: 5 - Payment screen
- Checkout step: 4 option: Add a company - Add a company from payment screen
- Checkout step: 4 option: Add a payer - Add a payer from payment screen
- Checkout step: 4 option: Payment Page (Credit Card) - Payment Page Credit Card tab;
- Checkout step: 4 option: Payment Page (Corporate Pass); - Payment Page Corporate Pass tab;
Add or remove items from shopping cart:
dataLayer.push({
    'event': 'addToCart' | 'removeFromCart',
    'ecommerce': {
      'currencyCode': 'AUD',
      'add': {
        'products': [{
          'name': {{item_name}},
          'id': {{item_id}},
          'price': {{item_price}},
          'category': 'Course Class' | 'Product',
'quantity': 1,
        }],
      },
    },
  });
Set Checkout Page:
dataLayer.push({
    'event': 'checkout',
    'ecommerce': {
      'checkout': {
        'actionField': {
          'step': {{ 1 | 2 | 3 | 4 | 5 }},
          'option': "Init Checkout Process" | "Add Payer" | "Edit Contact Details" | "Summary Page" | "Payment Page"
        },
        'products': [{
         'name':{{item.name}},
         'id': {{item.id}},
         'price': {{item.price}},
         'category': 'Course Class' | 'Product',
         'quantity': 1,
        }],
      },
    },
  });
Set Checkout Page Option (something like sub page/phase):
At the moment we have options only for 4,5 steps
dataLayer.push({
  'event': 'checkoutOption',
  'ecommerce': {
    'checkout_option': {
      'actionField': {
        'step': {{ 4 | 5 }},
        'option': "Change Parent" | "Add concession" | "Add contact" | "Add a company" | "Add a payer" | "Payment Page (Corporate Pass)" | "Payment Page (Credit Card)"
      },
    },
  },
});
purchase:
dataLayer.push({
    'event': 'purchase',
    'ecommerce': {
      'purchase': {
        'actionField': {
          'id': {{ data.id }},
          'affiliation': 'credit card' | 'corporate pass',
          'revenue': {{ amount.total }}, // includes tax
        },
        'products': [{
         'name':{{ item.name }},
         'id': {{ item.id }},
         'price': {{ item.price }},
         'category': 'Course Class' | 'Product',
         'quantity': 1,
        }],
      },
    },
  });
When you’re done setting up within Google Analytics, head over to the websiteSetup-analytics section to connect your analytics with your onCourse instance. You won’t see any data from onCourse until this last step is complete.
Updated over 1 year ago
