Example discount campaigns
Some examples of possible campaigns are outlined below:
- Select Discounts from the dashboard by searching or using your favourites
- Select + button from the bottom right of the window
- In the new window, enter a name for this concession e.g. Seniors Card Discount
- To set a 10% discount, select the Discount Percent under Value Type and type 10 into the discount value field.
- You can also set a minimum and maximum amount for the concession e.g. min $1 and max $10 and set the discount to round to the whole dollar, nearest 10c or nearest 50c.
- Ensure the option 'available for online enrolment' is ticked, if you want this discount to be available to Seniors enrolling online. If it is unticked, the discount will only be available to Seniors enrolling via the office.
- Setting a valid from and valid to date is optional. If you want to make the discount apply at all times, leave these fields blank.
- Move to the 'students' section. In this example, you might select 'with the following concession type(s) and add concession types you have previously defined asAged Pensioner concession or Seniors card concession. You may also choose to add, or use instead the parameter Age over 60. This will require the student to supply a valid date of birth as well / instead of a concession card to access the discount.
- If you would like students to see the discounted fee that may be eligible for when browsing the web, ensure you have not ticked 'Hide discounted price on web'. This will suppress the display of the price on your onCourse website.
- The last section allows you to assign this discount to certain available classes. You can add or remove classes by searching for the by name, courseClass code, or using a search query. Try 'isActive is true' to add all your currently active classes.
In this example we will create a last minute discount for our previously enrolled students.
-
Create a code for your promotion. This will be what students enter on your website to access the promotional discount (or can be entered by your enrolment staff with phone, mail or in person enrolments). An example code might be VIPSTUDENT.
-
Name and describe your promotion and decide if it is to be available to students enrolling online and through the office, or only to students enrolling through the office.
-
Set the amount and valid to and from dates. In this example we have limited the date to a one week range. It is usual for a promotion to run for a set period of time, but you could leave these fields blank to always allow this discount to apply.
-
This promotion is for re-enrolling students, so we can set it to students who have enrolled within 60 days.
-
Select your eligible classes. Generally promotions are limited to a few select programs, such as those which already are over the minimum required, or dance classes or those which are starting in the next two weeks. So lets try using 'startDatetime < [date]', where [date] is the date two weeks from today. Use the date picker.
Don’t forget, promotional codes only work if you market them. You can always email or SMS special promotions to your students to get them out there quickly. With most promotions you would not want to set a qualifier, like enrolled within x days, as you want as many people as possible to 'use' the special code to enrol in your classes, and hope the students you market the promotion to assist you in your marketing efforts by passing the deal on to their friends.
In this example we will create a membership students can buy to entitle them to a 100% discount for any of our computer classes for the next six months.
- Open the membership window and create the membership for purchase. Set a cost for purchase and the duration of the membership in days.
- Open the discount window and create the discount policy for computer club members. The discount is for 100%. Decide if you want this discount available to students who hold this membership and enrol online, or only via the office.
- Leaving the option 'Hide discounted price on web' unticked is a good choice for this discount, as seeing the $0 enrolment fee online available will also encourage other students to purchase this membership for the benefits it provides.
- Go to the students section of the discount window and select the option 'Limit to students with Membership' and add the new membership you just set up be searching for its name. In this instance we will choose to apply this discount only to the student who purchased it.
- Go to the classes section on the discount window and add all your currently active classes.
- Save and close the record. The membership is now ready for purchase, and the discount policy as defined will be applied.
In this example we will create a concession based discount for college staff, entitling them to 50% off all classes. The concession type 'staff' cannot be self selected on the website.
- Create a new concession type in Preferences > Concession Types called 'Staff' and de-select the option 'Allow students to self-select on the website'. This is because we only want college staff to determine who is a staff member (and entitled to the discount). This concession will not require a concession card number or expiry date either.
- Ensure all college staff whom you want to access this discount have student/tutor records in onCourse, and have the concession type 'staff' added to their record.
- Create a new discount called 'College staff' and leave the option 'Available via online enrolment' selected. This will let staff self enrol and access the discount online. Set the value to 50%, and a maximum value if desired.
- Tick the 'Limit to students with Concessions' switch, then apply the discount to students with the following concession types - Staff. Ensure the option is ticked 'Hide discounted price on web'. This way the general public visiting the website will not be privy to the discount available to staff members.
- On the classes section, add all the applicable classes for this discount.
- When college staff enrol online, the discount will be applied automatically during the checkout process. They will not see the details of this 'hidden' discount until they have been matched as a staff member using their first name, last name and email address on record.
In this example, we will offer a $10 discount to students who enrol in two or more classes for themselves, or with a friend from the list of available classes.
-
Open the discount window and create a new discount called 'Buy two and save $10'. In the discount value, set the discount dollar to $5 (if your classes have GST included in their fee, to achieve a $10 discount over two enrolments, you can set the discount value as $5.45, and set the rounding to nearest dollar)
-
In the students section, make sure 'restrict this discount to certain students' is unchecked.
-
In the classes section, add your classes to which the discount applies. Lets try a tag this time, so type # and then select a tag from the list.
-
In the bottom of the panel, enter the option 'Require at least [2] enrolments on one invoice from the classes above.Save and close the record.
Setting this discount at 2 requires at least two enrolments to trigger the discount. If there are three enrolments eligible in one enrolment process, then the discount applied will be $15.
-
When a checkout process is created that includes at least two enrolments from this list, each eligible enrolment added will have the $5 discount applied. If you remove enrolments from the window, and the set of enrolments are no longer eligible, the discount will be automatically removed from all enrolments.

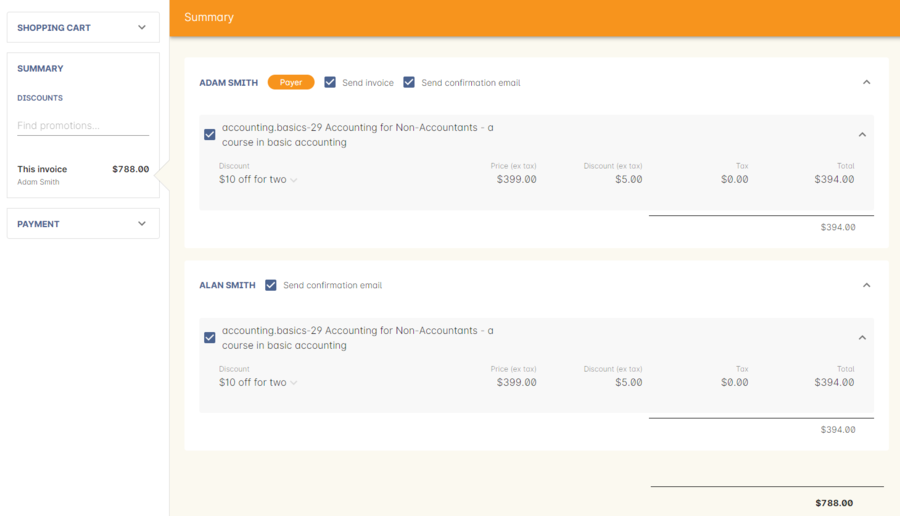
Figure 520. Group enrolment discount in checkout,showing a total $10 discount across the two enrolments

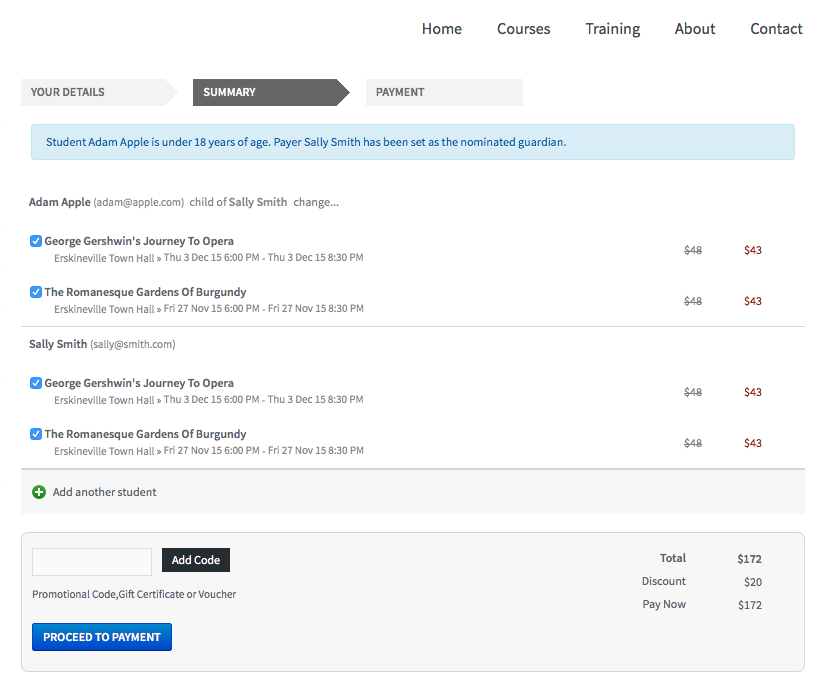
Figure 521. Group enrolment discount on the web,showing a total $20 discount across the four enrolments,where two students are each attending two classes
Updated over 1 year ago
